Anyone have any idea on how to add lights for the cargo area? I don’t know how or why but it appears there is no lighting back there as I recently discovered on a dark and moonless night at the campsite. The only overhead lights are the front console map lights and 2nd row. What the heck Toyota?
Navigation
Install the app
How to install the app on iOS
Follow along with the video below to see how to install our site as a web app on your home screen.
Note: This feature may not be available in some browsers.
More options
You are using an out of date browser. It may not display this or other websites correctly.
You should upgrade or use an alternative browser.
You should upgrade or use an alternative browser.
Toyita forgot a light for rear Cargo Area??
- Thread starter Winchester44
- Start date
Looks as if Toyota fixed you up for the 2025 model year.Anyone have any idea on how to add lights for the cargo area? I don’t know how or why but it appears there is no lighting back there as I recently discovered on a dark and moonless night at the campsite. The only overhead lights are the front console map lights and 2nd row. What the heck Toyota?

2025 Toyota Land Cruiser Drops First Edition, Now Starts From $56,450 | Carscoops
The rugged off-roader remains largely unchanged for the 2025 MY, offering a new color option and liftgate lights
There are some aftermarket options on ebay
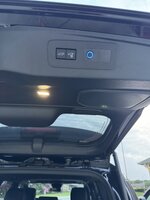
It has these lights already on either side. They work well enough. LC trim premium.

Last edited:
- Thread starter
- #5
can you send link please.There are some aftermarket options on ebay
Last edited:
- Thread starter
- #6
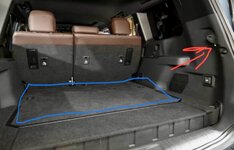
It has these lights already on either side. They work well enough. LC trim premium.
View attachment 13362
Curious why you feel that way? They seem to only cover about 1/4 of the cargo area and are also mounted low, when you have items stacked above them, they are concealed.
Maybe OK to illuminate three or four grocery bags but not really enough to illuminate the whole cargo area like a simple overhead light that every other Toyota SUV seems to have to the best of my knowledge.
Attachments
Last edited:
- Thread starter
- #7
Looks as if Toyota fixed you up for the 2025 model year.
2025 Toyota Land Cruiser Drops First Edition, Now Starts From $56,450 | Carscoops
The rugged off-roader remains largely unchanged for the 2025 MY, offering a new color option and liftgate lightswww.carscoops.com
Well, it would seem at least they acknowledged they missed this. Do you have a photo of where they are? Do they shine back inside?
- Thread starter
- #9
Could one plug a motion sensing night light into the inverter plug?
You surely could, but would have to turn on the inverter switch to get power to it.Could one plug a motion sensing night light into the inverter plug?
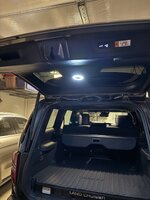
I've installed a USB-C rechargeable "under-counter" light from amazon. It attaches magnetically to a couple of adhesive metal pieces and can be adjusted to 3 brightness settings and even motion activated if desired. OK temporary solution until the OEM lights are available for retro-fit.
I saw these for a Jeep (same concept) on Amazon
I can vouch that these work amazingly well for a Jeep, not sure how they would attach or wire into a LC?
Have you guys seen EOD Guys build page? He installed a switch for the hatch courtesy lights. I believe it’s on a FE. I’m not sure if the courtesy lights are on the other trims. I’m still waiting on my non prem LC so I really don’t know.
Thread 'Eod Guy's Ride'
 Member Build - Eod Guy's Ride
These are pics from his build page.
Thread 'Eod Guy's Ride'
Member Build - Eod Guy's RideThese are pics from his build page.
Attachments
Okay according to this thread from Sticker Fab, FE and Premium trims come with the hatch courtesy lights.
Thread 'StickerFab - Soft Plastic Protection WIP'
StickerFab - Soft Plastic Protection WIP
Picture from that thread.
Thread 'StickerFab - Soft Plastic Protection WIP'
StickerFab - Soft Plastic Protection WIP
Picture from that thread.
Attachments
Added to my watch list. The cargo lighting is one of my biggest immediate pet peeves. I’d prefer them IN the cargo area but would consider on the liftgate. I also want to add a 12v and USB port connections back there.Have you guys seen EOD Guys build page? He installed a switch for the hatch courtesy lights. I believe it’s on a FE. I’m not sure if the courtesy lights are on the other trims. I’m still waiting on my non prem LC so I really don’t know.
Thread 'Eod Guy's Ride'
These are pics from his build page.
Does anyone have the part number of the lifgate with the lights?
It should be pretty straightforward to replace it. Just a matter to find out how much it costs.
It should be pretty straightforward to replace it. Just a matter to find out how much it costs.
I use the lights shown here in my home's coat closet, cabinets in the garage, and over my work bench. They work great and have lasted a couple years now. The motion detection works perfectly. Highly recommended. https://www.amazon.com/gp/product/B08FXTTCJX/ref=ppx_yo_dt_b_search_asin_title?ie=UTF8&th=1You surely could, but would have to turn on the inverter switch to get power to it.
I've installed a USB-C rechargeable "under-counter" light from amazon. It attaches magnetically to a couple of adhesive metal pieces and can be adjusted to 3 brightness settings and even motion activated if desired. OK temporary solution until the OEM lights are available for retro-fit.
View attachment 13687
View attachment 13686
View attachment 13685
View attachment 13684
Seems the UK FE doesn’t have the tailgate lights - at the equivalent of $104k Toyota obviously need to save money by cheapening the spec for us Brits
Be interested to see if there are options to swap panels to add the lights (not that we should have to do it)
Be interested to see if there are options to swap panels to add the lights (not that we should have to do it)
I guess UK FE is the same as Kazakh version. Comparing to US version in Kazakhstan FEs don't have:Seems the UK FE doesn’t have the tailgate lights - at the equivalent of $104k Toyota obviously need to save money by cheapening the spec for us Brits
Be interested to see if there are options to swap panels to add the lights (not that we should have to do it)
-hybrid.
-FE roof rack
-FE skid plates
-FE mud flaps
-FE rocksliders
-tailgate lights
-road signs assistant
-sun roof
FEs have in base:
-rear heated and ventilated seats
-volume knob in the center
-hdmi port
-cargo cover
-headlights washer
-FE labels
-Geolandar AT tires
-FE floor mats
____________
Non-FE versions in Kazakhstan can be equipped with 2,7 NON-TURBO gasoline or 2,8 turbo-diesel. You can also choose a 3rd row in a LC. And we don't have 1958.
Last edited:
- Moderator
- #20
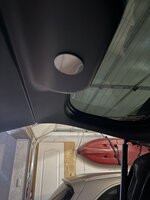
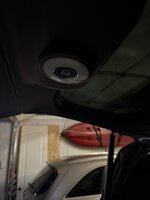
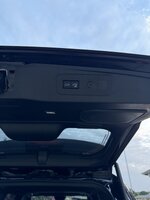
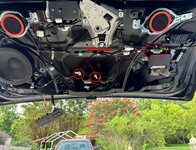
That's a good solution, IDK if lower trims are wired in the hatch for lights. "Rear Hatch Light Orig" pic are where the wire connectors are located in the hatch.You surely could, but would have to turn on the inverter switch to get power to it.
I've installed a USB-C rechargeable "under-counter" light from amazon. It attaches magnetically to a couple of adhesive metal pieces and can be adjusted to 3 brightness settings and even motion activated if desired. OK temporary solution until the OEM lights are available for retro-fit.
View attachment 13687
View attachment 13686
View attachment 13685
View attachment 13684
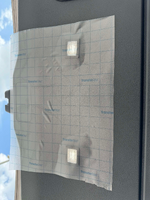
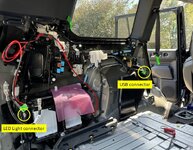
it would be very easy to sister some wires from the existing USB port (located on the dvr's side 3rd row seat) and run them behind the Dvr's side cargo area trim panel, up the "D" pillar across the rear to the center and through the existing "pass through boot" and exit at the gap between the hatch lower/upper trim panels. That way the light would always be charged but function when the vehicles is off. I'm not sure if all trims have the USB ports, but if they don't, it might be worth a peek to see if they are wired for the USB "Side Panel" pic. If you pop out the 3rd row cup holder and look forward you may be able to see the connector, IDK.
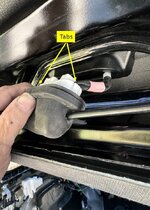
The rear hatch boot is easily removed, WARNING! do NOT try to pry the rubber to get it to pop off like normal panels or you'll break the white plastic keeper! Remove the boot by grasping the flat spot of the rubber boot and pull towards you and work it off the plastic keeper, once the rubber is loose, the white keeper has tabs "Boot2" pic and allows it to drop out of the body. Once you have the wires run through both ends of the boot, stretch the rubber around the white keeper (there is a groove in the rubber boot that the white keeper seats in) and snap it back into the body. Disregard the black coax exiting the rubber boot on the R/H side.
Attachments
Similar threads
- Replies
- 10
- Views
- 3K

