OP
OP
- Thread starter
- Moderator
- #61
Follow up........ It's not a simple process to tap into the locking mechanism wires. I mean it is, but the two trim levels are so different concerning the rear hatch locking mechanism electronics. I'll have to put a lot more thought and study into this.
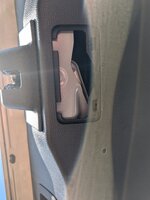
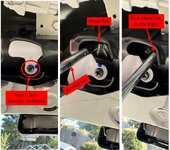
I do know that if you haven't tried to manually unlock the rear hatch from the inside, you SHOULD practice before you need to actually do it. There is absolutely no land marks and very, very awkward to use the Phillips screwdriver to turn the white thing 1/4 turn counter clockwise. Then trying to guess where the little metal tab is was very, very difficult.
I did manage to remove the entire rear tray while the door was shut and locked, which allowed me to see what I was doing and it popped open 1st try....... I removed the little white thing entirely, should I ever have to manually unlock the hatch in the future.
The back story.......... if you disconnect the locking mech connector you have to initialize the rear door opener. Super simple except IF the lock, got locked, while you were pushing it shut during the initialization process (fob was in my pocket and something in my pocket depressed the button) there was no auto movement while it draws it tight and locks, it just locks and nothing worked, except for the damned beep, beeeeeeeeeeeep sound. So I managed to get it manually unlocked and tried again, same result. Manually unlocked it a 2nd time, tried again with the same results. Manually unlocked it a 3rd time, this time I disconnected the neg battery cable, waited 5 minutes, reconnected and this time it completed the initialization process. All works as it should.