- Thread starter
- #61
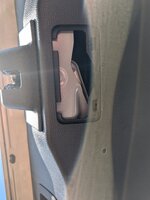
The trim covering comes off much easier with each removal, with a plastic trim tool, it was easy to pop off even with the limited space.Wow that's amazing. I'm so glad we're having this discussion because it's such an unnatural and awkward mechanism.
That's a great idea to remove the white thing. I'll do the same in the near future.
I also put a phone accordion holder thingy Amazon.com
On the black plastic trim part so that I could simply squish it in when I'm not using it and pull it out when I need it.
I could use this accordion phone thingy to remove the black piece of trim when I want to open the hatch from the inside without much trouble.
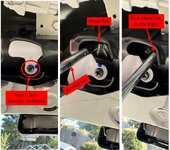
However, figuring out how to open it manually without tools will be the next challenge.
Also figuring out what I could put on that mechanical opener while also being able to put the plastic trim part back on. Will be interesting to figure out.
If you want a permanent modification, you could remove the lock/latch (4 bolts) remove all the internal plastic coverings and extend the little lever (welding would be required) so that once the external cover trim piece was removed you could use your finger to operate it. The entire mech is surround by plastic shields that could be trimmed once the lever is extended (we're talking less than 1/2").