๐Ÿ› ๏ธ Member Build Eod Guy's Ride

Member Build
  • Thread starter
  • Moderator
  • #61
Follow up........ It's not a simple process to tap into the locking mechanism wires. I mean it is, but the two trim levels are so different concerning the rear hatch locking mechanism electronics. I'll have to put a lot more thought and study into this.

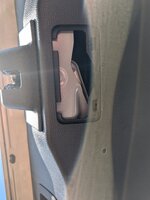
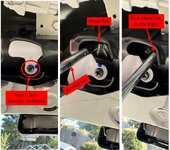
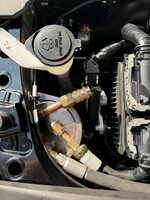
I do know that if you haven't tried to manually unlock the rear hatch from the inside, you SHOULD practice before you need to actually do it. There is absolutely no land marks and very, very awkward to use the Phillips screwdriver to turn the white thing 1/4 turn counter clockwise. Then trying to guess where the little metal tab is was very, very difficult.

I did manage to remove the entire rear tray while the door was shut and locked, which allowed me to see what I was doing and it popped open 1st try....... I removed the little white thing entirely, should I ever have to manually unlock the hatch in the future.

The back story.......... if you disconnect the locking mech connector you have to initialize the rear door opener. Super simple except IF the lock, got locked, while you were pushing it shut during the initialization process (fob was in my pocket and something in my pocket depressed the button) there was no auto movement while it draws it tight and locks, it just locks and nothing worked, except for the damned beep, beeeeeeeeeeeep sound. So I managed to get it manually unlocked and tried again, same result. Manually unlocked it a 2nd time, tried again with the same results. Manually unlocked it a 3rd time, this time I disconnected the neg battery cable, waited 5 minutes, reconnected and this time it completed the initialization process. All works as it should.
Wow that's amazing. I'm so glad we're having this discussion because it's such an unnatural and awkward mechanism.


That's a great idea to remove the white thing. I'll do the same in the near future.


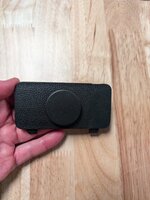
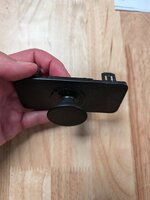
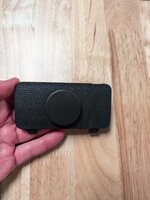
I also put a phone accordion holder thingy Amazon.com

On the black plastic trim part so that I could simply squish it in when I'm not using it and pull it out when I need it.

I could use this accordion phone thingy to remove the black piece of trim when I want to open the hatch from the inside without much trouble.

However, figuring out how to open it manually without tools will be the next challenge.

Also figuring out what I could put on that mechanical opener while also being able to put the plastic trim part back on. Will be interesting to figure out.
 
  • Thread starter
  • Moderator
  • #63
Wow that's amazing. I'm so glad we're having this discussion because it's such an unnatural and awkward mechanism.


That's a great idea to remove the white thing. I'll do the same in the near future.


I also put a phone accordion holder thingy Amazon.com

On the black plastic trim part so that I could simply squish it in when I'm not using it and pull it out when I need it.

I could use this accordion phone thingy to remove the black piece of trim when I want to open the hatch from the inside without much trouble.

However, figuring out how to open it manually without tools will be the next challenge.

Also figuring out what I could put on that mechanical opener while also being able to put the plastic trim part back on. Will be interesting to figure out.
The trim covering comes off much easier with each removal, with a plastic trim tool, it was easy to pop off even with the limited space.

If you want a permanent modification, you could remove the lock/latch (4 bolts) remove all the internal plastic coverings and extend the little lever (welding would be required) so that once the external cover trim piece was removed you could use your finger to operate it. The entire mech is surround by plastic shields that could be trimmed once the lever is extended (we're talking less than 1/2").
I am a hobbyist welder so that might be a solution for me once I have time to take it apart and play with it.

Thanks for all the insight
 
Have you removed the door panels yet? Thinking about customizing the First Edition lettering on the door panels in mine once it comes in when I do some additional sound proofing in the doors so they don't sound so tinny when they close. I was wondering if the small panels that say First Edition are easy to remove.
 
  • Thread starter
  • Moderator
  • #66
Have you removed the door panels yet? Thinking about customizing the First Edition lettering on the door panels in mine once it comes in when I do some additional sound proofing in the doors so they don't sound so tinny when they close. I was wondering if the small panels that say First Edition are easy to remove.
I've had the Dvr's door panel off, 3 screws..... one behind the trim on the door handle pull, two behind the arm rest trim panel, everything else is Christmas tree fasteners. I didn't pay attention the 1st Ed trim panel as far as easy removal.

I plan on dynomatting all 4 doors this fall, too dang hot right now......LOL
 
The trim covering comes off much easier with each removal, with a plastic trim tool, it was easy to pop off even with the limited space.

If you want a permanent modification, you could remove the lock/latch (4 bolts) remove all the internal plastic coverings and extend the little lever (welding would be required) so that once the external cover trim piece was removed you could use your finger to operate it. The entire mech is surround by plastic shields that could be trimmed once the lever is extended (we're talking less than 1/2").
 

Attachments

  • PXL_20240827_152616344.jpg
    PXL_20240827_152616344.jpg
    165.1 KB · Views: 112
  • PXL_20240827_152609604.jpg
    PXL_20240827_152609604.jpg
    283.8 KB · Views: 83
The trim covering comes off much easier with each removal, with a plastic trim tool, it was easy to pop off even with the limited space.

If you want a permanent modification, you could remove the lock/latch (4 bolts) remove all the internal plastic coverings and extend the little lever (welding would be required) so that once the external cover trim piece was removed you could use your finger to operate it. The entire mech is surround by plastic shields that could be trimmed once the lever is extended (we're talking less than 1/2").
It seems like I'll have to remove the whole tailgate trim to access that white piece you mentioned.

Did you access that white piece with the trim on and just little square removed.

Pic attached
 

Attachments

  • PXL_20240827_152854321.jpg
    PXL_20240827_152854321.jpg
    284.2 KB · Views: 79
  • PXL_20240827_152609604.jpg
    PXL_20240827_152609604.jpg
    283.8 KB · Views: 92
  • Thread starter
  • Moderator
  • #69
Mine doesn't look like your's..... LOL

I wonder if your's is different due to not having the auto door opener etc.......
 

Attachments

  • Manual Unlock.jpg
    Manual Unlock.jpg
    156.5 KB · Views: 94
  • Thread starter
  • Moderator
  • #70
The hatch trim is fairly easy to remove, no tools required. Start at the top center piece (above the glass), then the two upper side pieces and for the grand filially the large lower piece. The lower piece .... grapse it at the top center hump and a quick jerk and it'll start coming off, then just work around the edges with quick jerks and it'll come off.

I'm the type that I want to understand how things work, So I'd remove it and figure out what's what. Please take some pictures as I too would like to know how your's is configured....... heck it might be easier to modify for a handle.
 
Lighted Door Sills Mod: Took about 15 minutes, Yellow dot is the wiring plug (passenger side is in the same location) a hook tool is the best tool to unlatch the blanking plug. The Blue christmas tree fastener stayed in when the OEM sills were removed, you will need to remove it before you install the lighted sill (new ones are already mounted in the new sill).

Center Cap Mod: Bought some Center Caps took them apart, painted them with "Ford Dark Shadow Gray" touch up paint.

Relay Box Mod: As always you need extra protected circuits to run Winches, lights, air compressor etc....

Relay 1 - I have used this relay box on several different vehicles and have been very happy with it. I have de-pinned (removed all the normally closed (blue) wires) and re-wired the #1 (40amp) relay ground to have it's own ground vs the built in ground buss.
Relay 2 - Mount made out of 1/16" alum
Relay 3 - Mount installed making sure not to touch the ABS lines
Relay 4 - Relay box installed
Relay 5 - Routing of the Relay box power supply main wire to the 12v Buss bar (installed in front of the air filter box).
Relay 6 - The yellow wire will power a relay that will power a ASSY buss bar (buss bar will be in the cabin). I will hook the yellow wire to one of the unused "key on" fuse blanks.

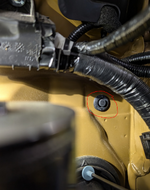
There is a removable plug to the right of the brake booster almost to the cowl, approx 1/2" in diameter....... it's easily removable and will allow 8, 16 gage wires to pass from the engine bay to the cabin. Harbor Freight gromet kit has the exact grommet to protect the wires......

Horn Mod: I couldn't like the "meep meep" horns, The Toyota premium (08522-60010) sound much louder and better!

Rear Hatch Light Mod: I was in the back and the curtesy lights in the rear hatch would not go off. Removed the rear hatch trim piece and installed a switch in the power side of the existing curtesy light wiring. I super imposed a rough outline of the existing and new wire runs.

Lug Wrench (Metric), not really a Mod but it's hands down the best and most compact lug wrench I've ever owned!
What brand is the lug wrench. Pretty sure I need that.
 
I am getting ready to add a Wescott Roof Rack with a light bar. I am hoping you can answer a couple of questions:
Where did you source the Switch for the Compressor and is it in fact the same as the 2024 Tacoma?
When you opened the dash for the switch is is only a blank and you have to wire the whole thing? Or is it like the Bronco where there is a plug which is already wired and you plug in the switch and then under the hood there is a pigtail you tie in to?

I can open up the dash but if you could answer that it would help me a lot!

Thanks
 
  • Thread starter
  • Moderator
  • #75
I am getting ready to add a Wescott Roof Rack with a light bar. I am hoping you can answer a couple of questions:
Where did you source the Switch for the Compressor and is it in fact the same as the 2024 Tacoma?
When you opened the dash for the switch is is only a blank and you have to wire the whole thing? Or is it like the Bronco where there is a plug which is already wired and you plug in the switch and then under the hood there is a pigtail you tie in to?

I can open up the dash but if you could answer that it would help me a lot!

Thanks
Switches are from CH4x4:

Ther are three basic switch sizes, Cube, Small and Full. The LC uses "Cube".

You do have to run new wires and in my write up is how I did mine. At a minimum you will need a fuse, relay and power source.

If I were to wire a light bar on the roof rack and it was the only exterior accessory, I'd mount the relay on the jack cradle (there's lots of room back there).

To wire the relay:
Run the trigger wire from the relay to switch (relay terminal 85 or 86 doesn't matter which one)

Run the light power source wire behind and up the dvr's side, rear trim panel and exit the interior via the rear hatch accordion boot. (relay terminal 87)

Use one of the "jack cradle" mounting bolts as the relay ground (relay terminal 85 or 86 whichever one wasn't used for the trigger wire)

Run the power wire from the 12v battery to the relay (relay terminal 30), utilizing the 12v battery "extra" stud (see my 12v outlet write up for how I did that)

To wire the switch:
Run a single trigger wire (min 16 gage) from the relay, behind the dvr's side rear trim panel, under the dvr's side door sill plates, behind the dvr's side kick panel to the switch bank.

There are a couple of empty 8mm bolt holes on the dash frame (when you remove the dash "side panel") that you can easily attach the switch's ground wire.

Run a new wire from the dvr's side, under hood, fuse box using a fuse tap (see my write up on page 1) through the firewall, there is a OEM hole located on the firewall just to the right and above of the existing OEM wire bundle that passes through the firewall. You can remove the existing rubber plug and use a ice pick to poke a hole through the plug and insert your switch power wire. After you route the new wire into the cabin, you can re-insert the rubber plug.
1727349517453.png
 

Attachments

  • Grommet.png
    Grommet.png
    1.7 MB · Views: 69
Last edited:
Hi, I really admire the effort and attention to detail evidenced by the customizations to your LC, which is why, given your obvious expertise, and as a newbie to off-road trucks, I wanted to ask specifically about the onboard air. I think I'm missing/not understanding all/some of the advantages of doing this when the truck itself doesn't depend on air for the suspension.... Sure, not having to add alligator clips to a battery point to power a compressor is a convenience, but if I still have to pop the hood/pop some hidden compartment to connect a long air hose to the compressor to then lead to each of the tires is it really that much more convenient? I'm sure I missed something. Did you plumb an air connection to a convenient spot next to each tire such that you only drag a small air hose (3-4 ft) to a convenient connection point next to each tire and voila air? Please illustrate me. Thanks in advance.
 
  • Thread starter
  • Moderator
  • #77
Hi, I really admire the effort and attention to detail evidenced by the customizations to your LC, which is why, given your obvious expertise, and as a newbie to off-road trucks, I wanted to ask specifically about the onboard air. I think I'm missing/not understanding all/some of the advantages of doing this when the truck itself doesn't depend on air for the suspension.... Sure, not having to add alligator clips to a battery point to power a compressor is a convenience, but if I still have to pop the hood/pop some hidden compartment to connect a long air hose to the compressor to then lead to each of the tires is it really that much more convenient? I'm sure I missed something. Did you plumb an air connection to a convenient spot next to each tire such that you only drag a small air hose (3-4 ft) to a convenient connection point next to each tire and voila air? Please illustrate me. Thanks in advance.
For me it has to do with securely storing the air compressor, it's got a bit of weight to it, In the event of a major accident, I didn't want a heavy object flying around the cabin. Then there is the convivence of the air chuck and air tank being mounted in a fixed location. Initially I wanted to mount everything inside the cabin and plumb the air chuck into the rear storage tray but, unfortunately you have to remove the L/H side tray in order to access the 12v battery. My battery went flat early in my ownership and it's a pain to access the battery, so that area was a no go.

I've mounted air compressors to the under carriage which always led to mud being caked on them and making them run hotter than they should, I mounted one behind the front bumper on my Tacoma which works well, but plumbing, air tank and maintenance is time consuming to gain access. The LC had a perfect sized spot high up under the hood and a perfect sized spot for the air tank really close to it, along with easy access to 12v etc.....

I use a DIY built, 4 line air hose. Each line is plumbed into a manifold and each has a locking chuck. I plug the manifold into the air compressor, then one line to each tire. I can deflate or inflate all 4 tires to whatever pressure at the same time. I use a very small air tank not for the volume but for plumbing of the air chuck, pop off valve and the pressure switch. (attached is the air chuck installed)

If you're only going to use a compressor to add air to an occasionally low tire, it's probably not worth the trouble of a permeant mount
 

Attachments

  • Air Compressor 15.JPG.jpeg
    Air Compressor 15.JPG.jpeg
    343.1 KB · Views: 45
Hi, I really admire the effort and attention to detail evidenced by the customizations to your LC, which is why, given your obvious expertise, and as a newbie to off-road trucks, I wanted to ask specifically about the onboard air. I think I'm missing/not understanding all/some of the advantages of doing this when the truck itself doesn't depend on air for the suspension.... Sure, not having to add alligator clips to a battery point to power a compressor is a convenience, but if I still have to pop the hood/pop some hidden compartment to connect a long air hose to the compressor to then lead to each of the tires is it really that much more convenient? I'm sure I missed something. Did you plumb an air connection to a convenient spot next to each tire such that you only drag a small air hose (3-4 ft) to a convenient connection point next to each tire and voila air? Please illustrate me. Thanks in advance.
It depends on your use case. I've got the twin ARB's mounted in my Sprinter under the hood and love it. I don't use it for airing down/up for off-road as much as for a fishing raft I have and filling bike tires. One port access under the hood, and one port at the rear. I'm thinking I may do the same set-up for the LC. EOD's points are all valid. Nice to just push a button and have unlimited air, and not having to find a spot to stow the compressor in the cabin, plus set-up and take down time. If you're new to off-roading, borrow and try first, then decide if you need/want a permanent install.

I know most auto air set-ups are 12v, but with the 120v plug in the rear and hybrid set-up, may not be a terrible idea to explore that route for 'once in awhile' set-up?
 
Last edited:
Relay Box Mod: As always you need extra protected circuits to run Winches, lights, air compressor etc....

Relay 1 - I have used this relay box on several different vehicles and have been very happy with it. I have de-pinned (removed all the normally closed (blue) wires) and re-wired the #1 (40amp) relay ground to have it's own ground vs the built in ground buss.
Relay 2 - Mount made out of 1/16" alum
Relay 3 - Mount installed making sure not to touch the ABS lines
Relay 4 - Relay box installed
Relay 5 - Routing of the Relay box power supply main wire to the 12v Buss bar (installed in front of the air filter box).
Relay 6 - The yellow wire will power a relay that will power a ASSY buss bar (buss bar will be in the cabin). I will hook the yellow wire to one of the unused "key on" fuse blanks.

There is a removable plug to the right of the brake booster almost to the cowl, approx 1/2" in diameter....... it's easily removable and will allow 8, 16 gage wires to pass from the engine bay to the cabin. Harbor Freight gromet kit has the exact grommet to protect the wires......

Horn Mod: I couldn't like the "meep meep" horns, The Toyota premium (08522-60010) sound much louder and better!

Rear Hatch Light Mod: I was in the back and the curtesy lights in the rear hatch would not go off. Removed the rear hatch trim piece and installed a switch in the power side of the existing curtesy light wiring. I super imposed a rough outline of the existing and new wire runs.

Lug Wrench (Metric), not really a Mod but it's hands down the best and most compact lug wrench I've ever owned!

Magnetic Unlocking Mod:

I use a magnetic sensor to unlock the driver's door with any metal object. Basically the sensor produces a Neg pulse when a metal object passes over it, the range is only about 1/4". I keep a spare fob (in sleep mode and in a faraday pouch) hidden in the interior, so I'll never be stranded due to lost keys.

It's a three wire hook up.
1 - (Brown) 12v always hot, easy (see picture below)
2 - (Blue) Ground
3 - (Black) Output to the trigger wire on the driver's door. Had to take half the truck apart to gain access to the proper wire, it was a royal PITA!

Radar Det Mount Mod:
This was quite the adventure, several variations and settled on this one.
The switch is a Redline 360C switch taken apart, switch and LED wires extended and mounted in the OEM blanking plug. Switch is a motorcycle after market mini-horn button colored with a sharpie, I don't like the color so I'll be painting it in the future. (edit) I found some 8mm black mini switches and replaced it with one of those.

The holder is a cell phone mount. The post is fabricated from parts of the cell phone holder and a 1/4 x 20stainless screw rethreaded on one end to M6 to allow the magnet to be screwed on. The adhesive disk is stuck to the dash, the adhesive disk was a bust, soon as the sun heated it up, it quit sticking. The solution was to remove the speaker grill (pulls straight up) grind down the ribs on the bottom side and epoxy a metal plate (black item on the L/H side) to the underside of the speaker grill. Radar mount 4 pic is the magnet (65 lbs) holding the Radar Det and mount upside down. It'll hold well for everyday driving (about 5lbs of holding force) but not off-roading. They sell a stronger magnetic base (120 lbs) that may hold better.

The power and ground wires are ran under the dash area to the OEM switch panel area (that's where all my add on wires are ran) , up the L/H side to the Instrument trim bezel. I pulled out the bezel enough to run the wires around it to the center speaker area of the dash and just let it exit there. Snapped the bezel back in and made for a nice tidy wiring for the radar det.

Radio Knob Mod: part# 90010-23059
I did the RAV4 radio knob swap on my Taco and Liked it. I did the RAV4 swap on the LC and like it as much. No tools are needed, just pull the OEM knob off, remove the spacer/beauty stand off from the RAV4 knob, push the RAV4 knob onto the radio shaft.

Radio Knob1 - RAV4 Knob with the insert removed from the backside.
Radio Knob2 - RAV4 on the left, LC OEM on the right
Radio Knob3 - RAV4 knob installed on the LC
I want that lug wrench! Can you tell me the name, or where you got it, or part number, etc? Thanks!
 
  • Thread starter
  • Moderator
  • #80
I want that lug wrench! Can you tell me the name, or where you got it, or part number, etc? Thanks!
Search box is your friend.......LOL


The Amazon link is in post #73 above.
 
Back
Top