🛠️ What Have You Done To Your LC250 Today?

Removed my running boards (step 1 in installing rock sliders).

Question for the 1958 folks: does the underside of your trim piece look like this, or is there some additional trim piece that clips on if you don’t have the running boards? That’s a lot of little pockets to store mud in.

View attachment 24078View attachment 24079

I'll be doing the same soon before my Greenlane Sliders show up. I assume (hope) it's pretty straightforward? I haven't been able to find any descriptions of how to remove them.
 
I'll be doing the same soon before my Greenlane Sliders show up. I assume (hope) it's pretty straightforward? I haven't been able to find any descriptions of how to remove them.
You can check my build thread for details. You unplug a cable and then take out 6 bolts. The center top bolt has a slot and hole so you just loosen it, take out the rest, then grab the running board and slide it off the bolt. When it’s off, put all the bolts back in. There’s a cap you can put on the cables, I don’t know the Toyota part number, I bought them elsewhere. Then tape/cable tie them up out of the way.

I have the Greenlane sliders waiting to be installed. I’m trying to figure out some kind of entry/exit light to put under them and power with the cables for the running boards.
 
I am looking at this as an option. I have a receiver with a ball. This provides some protection should you get rear ended and I think it may cover the opening which will be left open on the half cover.
Any more detail on this option, did you ever try it?
 
Installed Victory 4x4 aluminum engine skid. Very nice workmanship. No install instructions but was easy by watching the Tacoma skid video. Have to remove the two ends on the lower air dam, and it mounts to the recovery points not the radiator support bracket.
 
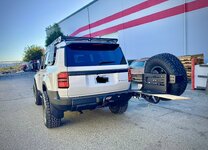
Went to Dirtcom yesterday and AJ installed the Trail Swing!

IMG_1929.jpeg
 

Attachments

  • IMG_1930.jpeg
    IMG_1930.jpeg
    448 KB · Views: 82
Very nice looking Land Cruiser. Watch the video of The Cruiser Company rear bumper yesterday very nice. I had a Kaymar on my 80 series Land Cruiser. Great Looking.
 
Went to Dirtcom yesterday and AJ installed the Trail Swing!

View attachment 24318
I have the tire swing on my FJ 62 landcruiser and its a pain to open everytime I need to get in the back. I rarely get in the back as a result. That would suck on the new cruiser! I open the trunk constantly. Looks great though.

IMG_9383.jpeg
 
Does having the weight hanging farther back make the front end feel ‘lighter’?
I am not feeling any difference. But I do have stiffer Dobinsons springs in the rear to account for the weight.
 
I’ve been learning a lot about my LC through recent upgrade projects. More to come but here’s the latest.

Installed Garmin PowerSwitch:
This is now my main accessories hub. Love that it interfaces with Apple Car Play, phone from outside vehicle and has so many custom settings. For now, I’ve hooked up ditch lights and the weBoost, but I have plans to add more front lighting and rear chase lights in the future. I wired a trigger/control line from the “panel” fuse, giving me the option for accessories to automatically power on/off with the dashboard. This allows me to auto on backlighting on some of my off-road lights and keep battery from draining on those accessories.
IMG_7573.jpeg


I ran into an issue with the Garmin setup and the weBoost on/off switch—it doesn’t seem to play nice—so I plan to bypass the Garmin and hook the weBoost directly to a relay. Just need to tweak the wiring.

Mounted the weBoost Antenna and MaxTraxx to the roof rack:
Ran the antenna wire through the rear hatch, using one of the rubber boot chases to reach the roof, where I mounted it to my Sherpa rack. It was a straightforward install—I made a small slit in the boot and sealed it with marine-grade black caulk. It works great, but I need to come up with a more permanent way to clasp the antenna to the rack.
IMG_7574.jpeg


I placed the weBoost amp under the rear seat and installed a 12V socket near the bottle jack. This lets me run the weBoost off my LC’s battery but also gives me the option to unplug it and power it from a Jackery if I’m camping for a few days to avoid draining the main battery.

Ditch Lights:
Not sure yet what I wanna do with the front bumper and light set up so went ahead and did ditch lights first. I added Diode Dynamics SSC2 combo ditch lights on CATuned Offroad brackets. Super happy with how this turned out! The lights are low-profile and the whole set up is solid. I wired the backlighting to run as DRLs. Note: If you’re planning to install hood struts, these brackets might conflict. For now, I’m keeping the ditch lights—no regrets, though I wish I’d realized the potential conflict earlier.
IMG_7561.jpeg

IMG_7569.jpeg


Badge Swap:
I swapped out the chrome i-FORCE MAX badge for a blacked-out version. Much cleaner look and more in line with my taste.
IMG_7559.jpeg
 
I would see these back rest protectors and matching cargo trays at Canadian dealerships promoting the LC250 on YouTube. Found out they are specific only to the Canadian market. Tried to order some but they would not ship to the US. So I flew there, bought a set and checked them as luggage. I love that you have easy access to the hidden compartments.
Yep, mine came with these stock, as well as a carpet (for whomever would want it).
 
Packing and testing gear for 10 day car-camping and fishing trip to CO next week. Removed the rear seat behind the driver seat, which was super easy and created the perfect spot for my fridge. Fridge is plugged into Ecoflow River Pro which is in turn plugged into the rear inverter. Every couple days, while driving for 2-3 hours, the inverter will quickly charge the Ecoflow. The high wattage output can charge the ecoflow as fast as when plugged into a house outlet. My bed platform and mattress are really comfortable as my 5'10" height fits perfectly, without touching seat or rear hatch. I can even move seat forward if needed for more room, but don't need to now. Storage under sleeping platform perfect place to stash chairs, tools, etc. Frontrunner cargo boxes hold kitchen kit and dry goods. Before leaving, I'll mount my awing and a jerry can (for sure with this silly 17.9 gallon gas tank!).

View attachment 10999View attachment 11000View attachment 11001View attachment 11002View attachment 11003View attachment 11004
Looks like a good time waiting to happen! (y)
 
Not climbing so a pretty active LC day!
  1. Installed both of the Toyota Skid plates. Install was easy once I figured out how the bracket and front plastic trim are meant to go 🤦🏻‍♂️
    IMG_1042.jpeg
  2. Deleted the iForceMax badge. As others have said, it’s easy with a bit of heat/goof-off and some fishing line or floss. I was pretty surprised by the amount of “ghosting” the badge left, but after couple passes with some Meguiar's polish, you can’t tell it was ever there!
    IMG_1020.jpeg
  3. Installed some door kick guards for all four doors. Got these from Amazon Japan. I don’t love how much they cover the speaker, but I have size 15 feet and a smallish garage, so would rather have them than door scuffs.
    IMG_1018.jpeg
 
Last edited:
Back
Top