Navigation
Install the app
How to install the app on iOS
Follow along with the video below to see how to install our site as a web app on your home screen.
Note: This feature may not be available in some browsers.
More options
You are using an out of date browser. It may not display this or other websites correctly.
You should upgrade or use an alternative browser.
You should upgrade or use an alternative browser.
First Mod I do to a Brand New Car... Cover Door Sill Protectors
- Thread starter Watufaka
- Start date
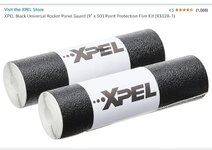
Hi! What part or piece is this? And where to order from?
- Thread starter
- #3
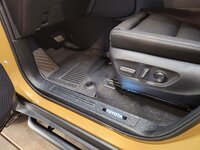
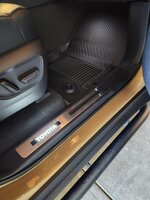
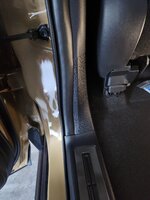
Basically covered these including the side foot panel. These are the areas that will get scratched and scuffed easily. Ordered from Amazon.Hi! What part or piece is this? And where to order from?
This stuff is great. Use a hairdryer to make it form fit. I used this stuff all the time.
I'm also putting some on the rear seat floor panel, below the rear AC controllers.
Attachments
You are talking about covering the painted part, correct? Do you have any template measurements? I bought some 3M PPF off Amazon with plans to do the same. I just need to buckle down and get it done.
- Thread starter
- #5
For now just the foot sills, including the surrounding plastic trim near the footwell. This is where it will easily scratch and scuff. I made a template for the Toyota illuminated light. Working on the rear right now but it's getting dark.You are talking about covering the painted part, correct? Do you have any template measurements? I bought some 3M PPF off Amazon with plans to do the same. I just need to buckle down and get it done.
The stainless steel look is nice, but not with scratches and scuff marks. Do it now before you need to buy a replacement which is $$$.
The best thing is it has almost the same texture as the plastic trim.
Attachments
Ok dumb question, how to install this? I have never tried something like this before and it looks like a really great idea especially on sill plates. Advice, tips, pointers will be greatly appreciated and thank you in advance!
- Thread starter
- #7
I'm no expert too. Just learning as I go. Here are my tips since I've done a few cars already. Again, the great thing about this stuff is it matches the interior trim.Ok dumb question, how to install this? I have never tried something like this before and it looks like a really great idea especially on sill plates. Advice, tips, pointers will be greatly appreciated and thank you in advance!
- Get enough material. I knew I was going to use the stuff in other areas too so I got the 9"x30' roll.
- Have a sharp xacto knife and scissors.
- Use a hair dryer to soften it up so you can stretch the stuff around the edges and corner and use your fingers to flatten them to whatever you are covering. Heat up the edges to as you tuck them in the side moldings.
- Don't try to cut them up in exact measurements. Just lay on them over with enough space around and cut. If you have bubbles, heat it up and flatten.
- Trace a template over the Toyota illuminated plate if you have one. Then place it over the material and cut with exacto knife. Then trim around the edges and tuck in.
- Lastly be careful when you cut with an exact knife that you do not cut any rubber trim around the lower door frame.
You will be surprise on how professional it will start to look. After you do one door you will be an expert on the rest of the doors.
- Thread starter
- #9
Did the passenger side today. Definitely getting better and faster with the second door sill. Couple more tips. Soften the material before cutting, makes it like cutting butter including the edges to tuck it. I use a plastic trim remover to flatten the edges after heating it up. Work angles and corners first before the flat areas. Lastly, you will need two pieces for the side foot panel. You can overlap, just heat it and it's not noticeable.Cool thank you so much! Another mod to add to the list!
Its a fun project and dont take long to do.
Isn’t transparent film works better there? The stainless steel look feels nice, why blocks it? Plus if you use transparent film you don’t even have to cut in the middle
- Thread starter
- #12
I'm doing transparent film on the lower painted door frame.Isn’t transparent film works better there? The stainless steel look feels nice, why blocks it? Plus if you use transparent film you don’t even have to cut in the middle
There are pre cut versions to save time.I'm doing transparent film on the lower painted door frame.
- Thread starter
- #14
You read my mind, exactly the ones I'm getting soon in the mail.
I think even more important are the painted section of the door sill as these tend to wear over time exposing the bare metal. I ordered these and am quite happy with them
- Moderator
- #16
Did the passenger side today. Definitely getting better and faster with the second door sill. Couple more tips. Soften the material before cutting, makes it like cutting butter including the edges to tuck it. I use a plastic trim remover to flatten the edges after heating it up. Work angles and corners first before the flat areas. Lastly, you will need two pieces for the side foot panel. You can overlap, just heat it and it's not noticeable.
Its a fun project and dont take long to do.
Very nice fit and finish!
Similar threads
- Replies
- 1
- Views
- 739
🛠️ Member Build
Eod Guy's Ride
- Replies
- 88
- Views
- 13K
- Replies
- 4
- Views
- 2K
- Replies
- 13
- Views
- 4K


