Navigation
Install the app
How to install the app on iOS
Follow along with the video below to see how to install our site as a web app on your home screen.
Note: This feature may not be available in some browsers.
More options
You are using an out of date browser. It may not display this or other websites correctly.
You should upgrade or use an alternative browser.
You should upgrade or use an alternative browser.
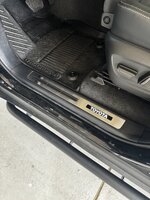
Door Sill Install
- Thread starter bgeorger
- Start date
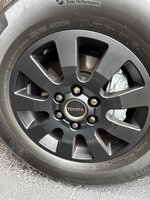
Nice. I just ordered the center caps eager to put em in.
Looks nice! Has anyone found any solutions to protect the painted part of the door sill?
When my windows were being tinted they asked me if I wanted them to put PPF on that part, I said absolutely!! I think you can probably buy some on amazon and cut it yourself pretty easyLooks nice! Has anyone found any solutions to protect the painted part of the door sill?
I installed the doors sills today and as others have said, removing the plugs on the factory wire harness are the only pain point in the process. Some others posted that it was difficult to remove them, that they had to use an ice pick, etc.
I struggled with them too until I noticed that there is a release on the connectors tip. Just squeeze the end of the connectors with some thin pliers and the clips snap right open. Easy peasy. Nice, Toyota!
I struggled with them too until I noticed that there is a release on the connectors tip. Just squeeze the end of the connectors with some thin pliers and the clips snap right open. Easy peasy. Nice, Toyota!
What does the rear door sills look like are they illuminated? Can you take a picture of the rears?Completed the install of the illuminated door sills and it was a breeze. If anyone gets hung up I’d be happy to walk you through it.
As a bonus, I did the heritage center caps.
I am assuming it is set for all four.
I also had PPF installed on the door sills (front and back) when I had the rest of the vehicle done. I’ve always done this on my vehicles and it does an excellent job of protecting them.Looks nice! Has anyone found any solutions to protect the painted part of the door sill?
Found a picture for othersWhat does the rear door sills look like are they illuminated? Can you take a picture of the rears?
I am assuming it is set for all four.
the rears are not illuminated
Hi there. I am starting the door sill install and see there appears to be a cover over the OEM factory plug. I don’t easily see how to remove that and expose the male end of the connector to do the install. I’m afraid to break that. Another post indicated to be ready to “break some clips”Completed the install of the illuminated door sills and it was a breeze. If anyone gets hung up I’d be happy to walk you through it.
As a bonus, I did the heritage center caps.
- Moderator
- #11
Use a hook tool. If you search this forum "EOD Guy's Ride" ..... it shows how I did it.
Note: I actually removed the fastener securing the connector to the body, it was a pain to disconnect and reconnect so I popped the fastener, no ill effects at all.
Note: I actually removed the fastener securing the connector to the body, it was a pain to disconnect and reconnect so I popped the fastener, no ill effects at all.
Thanks that helped a ton. I knew there had to be a release.I installed the doors sills today and as others have said, removing the plugs on the factory wire harness are the only pain point in the process. Some others posted that it was difficult to remove them, that they had to use an ice pick, etc.
I struggled with them too until I noticed that there is a release on the connectors tip. Just squeeze the end of the connectors with some thin pliers and the clips snap right open. Easy peasy. Nice, Toyota!
Thanks i figured it out there is a release on top of the connector cover. Depress that with thin needle nose pliers and the cover slides right off. No brute force or breakage required.Hi there. I am starting the door sill install and see there appears to be a cover over the OEM factory plug. I don’t easily see how to remove that and expose the male end of the connector to do the install. I’m afraid to break that. Another post indicated to be ready to “break some clips”
Any chance you have a part number for those heritage center caps? Not a fan of the ‘T’ logo caps as it looks out of place imoCompleted the install of the illuminated door sills and it was a breeze. If anyone gets hung up I’d be happy to walk you through it.
As a bonus, I did the heritage center caps.
I bought this from Amazon but I haven't used it yet. Been thinking about getting those lighted sills first.Looks nice! Has anyone found any solutions to protect the painted part of the door sill?
https://www.amazon.com/gp/product/B09JNVP7C5/ref=ppx_yo_dt_b_search_asin_title?ie=UTF8&th=1
- Thread starter
- #16
Yes, here you go!Any chance you have a part number for those heritage center caps? Not a fan of the ‘T’ logo caps as it looks out of place imo
PT280-35221-5F
thanks so much, gotta get this "mod" done asapYes, here you go!
PT280-35221-5F
Similar threads
- Replies
- 16
- Views
- 2K
🛠️ Member Build
Eod Guy's Ride
- Replies
- 83
- Views
- 10K


