It’s permanently in one of the cubbies in the back for sure.Even with a new battery it's a good idea to carry a jump box........... don't ask how I know this.....LOL
Navigation
Install the app
How to install the app on iOS
Follow along with the video below to see how to install our site as a web app on your home screen.
Note: This feature may not be available in some browsers.
More options
You are using an out of date browser. It may not display this or other websites correctly.
You should upgrade or use an alternative browser.
You should upgrade or use an alternative browser.
🛠️ What Have You Done To Your LC250 Today?
- Thread starter pnwlandcruiser_
- Start date
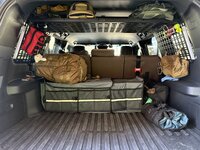
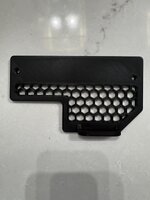
Just added the side panels to the molle storage shelf! Still working on how I want things mounted, but that will obviously be ever-evolving but love it already. Its a sturdy, great product, but the directions were horrible, at least for me. They said to basically install all the mounting brackets first and then piece on the panels and shelf, and maybe that works for some and my dexterity just isn’t great or my fingers are too big, but almost all of the bolts were unreachable for me, so I had to install in essentially 3 separate pieces (holding it up in place with one hand and mounting with the other). Probably not any easier but it’s what worked for me. MANY “F***!”moments but got er done.
Attachments
Crusty Dusty got new shoes today. Stayed with my tried and true BFG K03. 275/70/18. Looked at quite a few other tires, and after having K series on almost every truck/SUV I have owned, just kept going with them. Not the end all be all of tire, yet they have not let me down either.


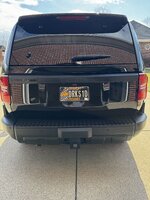
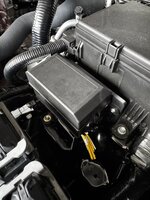
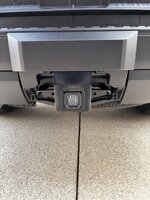
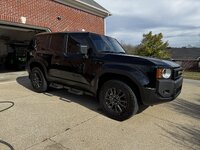
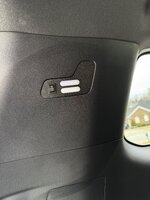
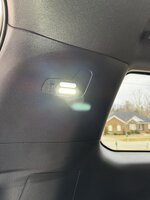
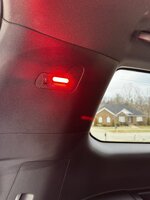
Well I did my first hand wash today as it got up to almost 70 here. I also installed the Diode Dynamics hitch light and installed my custom designed relay/fuse box bracket. I am working on a circuit breaker bracket as well as a buss bar bracket. I installed the cargo light from Obisan3D too. I also got my personalized license plate.
Attachments
-
 IMG_9684.jpeg419.5 KB · Views: 118
 -
 IMG_9695.jpeg357.7 KB · Views: 117
 -
 IMG_9694.jpeg340.7 KB · Views: 107
 -
 IMG_9693.jpeg187.9 KB · Views: 117
 -
 IMG_9685.jpeg340 KB · Views: 119
 -
 IMG_9683.jpeg542.2 KB · Views: 117
 -
 IMG_9681.jpeg536.3 KB · Views: 104
 -
 IMG_9680.jpeg532.8 KB · Views: 122
 -
 IMG_9690.jpeg488.7 KB · Views: 113
 -
 IMG_9691.jpeg345.9 KB · Views: 104
 -
 IMG_9692.jpeg347.7 KB · Views: 160
Last edited:
Looks Great! Did it require any drilling?Just added the side panels to the molle storage shelf! Still working on how I want things mounted, but that will obviously be ever-evolving but love it already. Its a sturdy, great product, but the directions were horrible, at least for me. They said to basically install all the mounting brackets first and then piece on the panels and shelf, and maybe that works for some and my dexterity just isn’t great or my fingers are too big, but almost all of the bolts were unreachable for me, so I had to install in essentially 3 separate pieces (holding it up in place with one hand and mounting with the other). Probably not any easier but it’s what worked for me. MANY “F***!”moments but got er done.
- Moderator
- #686
That looks fantastic, I assume with a 3D printer. I have thought about getting one (Bambo Lb X1C) as I think my CNC wood modeling skills would make for a fast learning curve. But I'm still contemplating if it would be used.
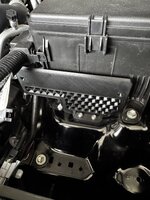
Yep it’s 3D printed. I used carbon fiber PETG filament. I am going to see how it holds up. If it doesn’t hold up well I will have a buddy of mine print it out of ASA filament.That looks fantastic, I assume with a 3D printer. I have thought about getting one (Bambo Lb X1C) as I think my CNC wood modeling skills would make for a fast learning curve. But I'm still contemplating if it would be used.
- Moderator
- #688
My knowledge in 3D printing is laughable! I know there are different filaments for different applications but that part of the process will be the most challenging for me. My neighbor is somewhat knowledgeable but he's only been doing it for a year and some of that stuff is expensive.Yep it’s 3D printed. I used carbon fiber PETG filament. I am going to see how it holds up. If it doesn’t hold up well I will have a buddy of mine print it out of ASA filament.
No sir, it bolts into the spot where the grab handles are, and it bolts into a spot that’s got a little cover over it like right above the cubby’s on the sides, and then it has a bracket that’s supposed to just rest on the window area with 3m tape but I just didn’t peel off the sticky side on the bottomLooks Great! Did it require any drilling?
I like the lights at side panels. Great job!Well I did my first hand wash today as it got up to almost 70 here. I also installed the Diode Dynamics hitch light and installed my custom designed relay/fuse box bracket. I am working on a circuit breaker bracket as well as a buss bar bracket. I installed the cargo light from Obsian3D too. I also got my personalized license plate.
Do you have a link for this obsian3d? I can’t find anything on the googlesWell I did my first hand wash today as it got up to almost 70 here. I also installed the Diode Dynamics hitch light and installed my custom designed relay/fuse box bracket. I am working on a circuit breaker bracket as well as a buss bar bracket. I installed the cargo light from Obsian3D too. I also got my personalized license plate.
Sorry its actually Obisan3D. Here is a link Obisan3DDo you have a link for this obsian3d? I can’t find anything on the googles
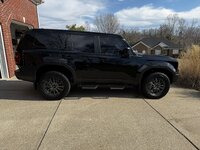
The center caps pop off easily with a plastic trim tool, no need to remove the wheel. I have the red ones and felt they were a little too flashy so I plastidipped em. I agree they would look great on yours.Was not all today but…
Tundra TRD BBS wheels and tires are on.
Westcott leveling kit ( front only), the front only raises about 1.5” so it sits nice and even now.
I pulled the front end apart and painted the “skid” plate and end caps, I prefer the painted look of the higher trims.
Added ZR Overland recovery points, nice solid parts.
So the only thing I’m on the fence about is the center caps, I have the red TRD caps and the Silver TOYOTA caps. Currently running the silver ones but can’t help thinking the red would look great with the red recovery points. I think I have to pull the wheels off to change them, they snap in tight.
How it started a few weeks ago…
View attachment 27200
View attachment 27203
View attachment 27202
View attachment 27205
View attachment 27206
Thanks!!Sorry its actually Obisan3D. Here is a link Obisan3D
Get those Pre-collared Lift Kit from WD, Giving that aggressive looks to those Rims.
I’ll be doing Dobinsons soon, same as for the FJ40 and it’s be great on that.
Last edited:
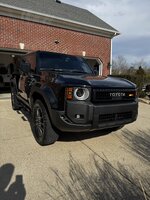
Wow, this looks great! Only 2" lift? It seems like more and it swallows up those 35's!I finally got my wheels and tires dialed in. View attachment 28627
I got estimate yesterday for Icon suspension. A stage 8, less the rear lower control arms and tubular UCA's instead of billet, so sort of customized, and feeling my way through this slowly. Not inexpensive but Icon seems like it is excellent stuff. How do you like it so far? Can you share specifics on that lift - like front and rear amounts and is there a small bit of rake left?
This is stage 8. It's 2.5" up front and 3" in the rear. There is still a slight rake which is what I wanted. I didn't touch the preload on the fronts, so this is what it would look like out of the box. The ride is much firmer, but better than stock overall. My other rigs are on Icon as well.Wow, this looks great! Only 2" lift? It seems like more and it swallows up those 35's!
I got estimate yesterday for Icon suspension. A stage 8, less the rear lower control arms and tubular UCA's instead of billet, so sort of customized, and feeling my way through this slowly. Not inexpensive but Icon seems like it is excellent stuff. How do you like it so far? Can you share specifics on that lift - like front and rear amounts and is there a small bit of rake left?
Similar threads
- Replies
- 4
- Views
- 822
- Replies
- 6
- Views
- 1K
- Replies
- 151
- Views
- 12K
- Replies
- 48
- Views
- 16K
- Replies
- 3
- Views
- 1K


