I installed a front and rear Viofo A229 Plus front and rear dash cam with a parking mode option. Here is the process I used in case it's useful to anyone else:
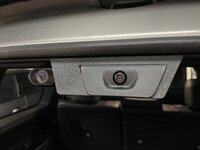
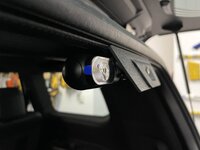
For the rear camera, I wanted something close to factory-looking. I designed a mount that snaps around the existing rear-view camera housing and 3D printed it. The viofo rear camera is a friction-fit slide into the mount, so no adhesives were used and no changes made to the LC (you can of course just use the supplied adhesives and stick it next to the existing camera instead):


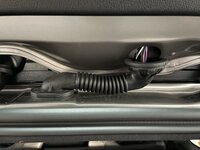
Snaking that wire through to the liftgate was the hardest part, but a super-clean look in the end with no visible wires to snag or catch, and out of the way when loading things:


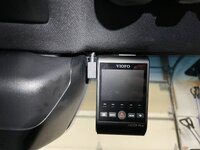
Once out of the liftgate, the wire was easy to run along the headliner to the front. Once there, I popped off the grab handle and A pillar trim to route it behind the airbag, back up to the windshield headliner, and down to the main unit (just to the right of the rear view mirror mount and out of my sight):


For power, I went with an OBD2 harness like this one. Since the dash cam supports a parking mode, this harness gives me the option of using it by supplying power when the vehicle is off. It does this only if:

Wiring is pretting simple along the side of the dash, up to the A pillar trim (again, remove the grab handle and trim and go behind the airbag), up to the headliner and to the cam. In the end, no visible wires, nothing plugged into USB ports or 12v outlets, plug and play wiring, easily removable, no changes to the LC, and a switch-operated parking mode.
I know Dongar adapters are popular, and if their parking mode option had been ready to buy I would have been very tempted to choose that option. I'm glad to have gone this route in the end, because I like being able to easily control when it is active with the flip of a switch. I don't want it using battery for that purpose while it's in my garage
For the rear camera, I wanted something close to factory-looking. I designed a mount that snaps around the existing rear-view camera housing and 3D printed it. The viofo rear camera is a friction-fit slide into the mount, so no adhesives were used and no changes made to the LC (you can of course just use the supplied adhesives and stick it next to the existing camera instead):


Snaking that wire through to the liftgate was the hardest part, but a super-clean look in the end with no visible wires to snag or catch, and out of the way when loading things:


Once out of the liftgate, the wire was easy to run along the headliner to the front. Once there, I popped off the grab handle and A pillar trim to route it behind the airbag, back up to the windshield headliner, and down to the main unit (just to the right of the rear view mirror mount and out of my sight):


For power, I went with an OBD2 harness like this one. Since the dash cam supports a parking mode, this harness gives me the option of using it by supplying power when the vehicle is off. It does this only if:
- The rocker switch on top of the harness is in the always-on mode
- The car's voltage is above a preset voltage threshold, intended to prevent the camera from draining the battery

Wiring is pretting simple along the side of the dash, up to the A pillar trim (again, remove the grab handle and trim and go behind the airbag), up to the headliner and to the cam. In the end, no visible wires, nothing plugged into USB ports or 12v outlets, plug and play wiring, easily removable, no changes to the LC, and a switch-operated parking mode.
I know Dongar adapters are popular, and if their parking mode option had been ready to buy I would have been very tempted to choose that option. I'm glad to have gone this route in the end, because I like being able to easily control when it is active with the flip of a switch. I don't want it using battery for that purpose while it's in my garage
Last edited:

