Channel set window deflectors

I decided to order one from EBay. Not gonna be official Toyota part but this is not a high tech just correct molding that is all it takes. I bet the cost making one of these are like $5. A bit ridiculous to ask $300~$500 just for a set of visor
They weren't 300-500, they were $124. The difference in the JDM and the ones on Ebay/Amazon is the front taper, rears not being capped and 2 doors vs 2 doors and rear side windows (which serve no purpose).
 
I used the link and part number listed in post #10 above.
I’d like to clarify that I can’t speak to the legitimacy of that site; it’s just a link that popped up when I did a google search of the part number. Please let us know if it’s legit, I think that would help a lot of memebers!
 
I’d like to clarify that I can’t speak to the legitimacy of that site; it’s just a link that popped up when I did a google search of the part number. Please let us know if it’s legit, I think that would help a lot
I’d like to clarify that I can’t speak to the legitimacy of that site; it’s just a link that popped up when I did a google search of the part number. Please let us know if it’s legit, I think that would help a lot of memebers!
I just ordered a set from the link you provided. Once I ordered, the charge came back to "Richmond Hill Auto Park Limited." When I did a search of the Canadian business registry, it comes back to a business that has been in business since 1968. So, I am feeling better about making the online purchase. Of course, that's not to say that the business still can't be sketchy but I feel a a little better about it. For those wondering, it came out to $121.35 US dollars, which includes shipping to Seattle, WA.
 
Last edited:
I ordered them from the link. I used paypal, thinking maybe it may give a little bit of protection. Once I ordered, I noticed that my credit card by "Richmond Hill Auto Park" in Ontario, Canada. When I google that name, it came back to

I just ordered a set from the link you provided. Once I ordered, the charge came back to "Richmond Hill Auto Park Limited." When I did a search of the Canadian business registry, it comes back to a business that has been in business since 1968. So, I am feeling better about making the online purchase. Of course, that's not to say that the business still can't be sketchy but I feel a a little better about it. For those wondering, it came out to $121.35 US dollars, which includes shipping to Seattle, WA.

Good to hear, I use PayPal if it’s offered, it just feels like extra insurance. That’s a great price, mine was $270 CAD 😬

Hopefully you can do a follow up post when it shows up!
 
Me too. Love to see your setup. Do you have a flat cargo area? If so, did you buy it or make it yourself?

Also, what rain deflectors are you using? I'm also waiting for WeatherTech come out with a land Cruiser version.
IMG_7321.jpeg
 
This is normal window/ door screening applied to magnetic strips on 3 sides of the window. The bottom is vinyl so I made the screen an inch longer than needed and tucked the extra into the channel, the magnetic strips are adhesive on one side, so the screen was pressed against the adhesive side then I smeared clear acrylic caulk on top of the screen side to add extra points of attachment to the magnetic strips. I’ve used this system for 20 years on 4th gen 4Runners with zero failures.
 
I'm waiting for AVS to release a set as I've always been satisfied with them in the past. The 24 LC is listed on the site, but no product as of yet.
 
Toyota dealerships usually have an online webstore. Just ordered from https://parts.brantfordtoyota.ca using part #08162-60840 for about $178 CAD. They only ship within Canada. So that's another option for Canadian folks. Its a special order item and I have a feeling its backordered. Will update once it ships.
 
Let us know if they ship
Update: I just received the deflectors. They were packaged well and the site is legitimate. Now I just need to figure out how to install them. They are stick on but also have clips. No instructions are included but I’m fairly good at things like this, so hopefully installation will be straight forward.
 
Update: I just received the deflectors. They were packaged well and the site is legitimate. Now I just need to figure out how to install them. They are stick on but also have clips. No instructions are included but I’m fairly good at things like this, so hopefully installation will be straight forward.
This is for a Lexus (close enough) I sourced from another member.
 

Attachments

  • Rain Guards, lexus_gx_wind_deflectors_pw162_60013_aim_005_364_0.pdf
    6.8 MB · Views: 63
I end up getting this from Ebay. It is designed both for J250 and GX550 and it fits very well. The only thing you don't have is that Toyota badge but I don't really care
 
As an eBay Associate we earn from qualifying purchases.
Toyota dealerships usually have an online webstore. Just ordered from https://parts.brantfordtoyota.ca using part #08162-60840 for about $178 CAD. They only ship within Canada. So that's another option for Canadian folks. It’s a special order item and I have a feeling it’s backordered. Will update once it ships.
Update

Visors came in within 7 days. Nicely packaged with bubble wrap legit OEM sourced. Just gotta figure out how to install these.
 
Update

Visors came in within 7 days. Nicely packaged with bubble wrap legit OEM sourced. Just gotta figure out how to install these.
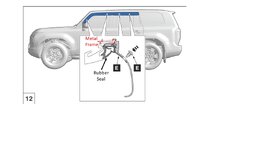
They were pretty easy once I figured out what to do. Sticking them on was easy, the clips took some figuring out. I kept thinking they were supposed to be held in behind the rubber seal. But they actually attach to the frame of the window. I put the clips in first, then attached the deflector. Then I was able to slide the clips to line them up and snapped them into the deflector.
 
They were pretty easy once I figured out what to do. Sticking them on was easy, the clips took some figuring out. I kept thinking they were supposed to be held in behind the rubber seal. But they actually attach to the frame of the window. I put the clips in first, then attached the deflector. Then I was able to slide the clips to line them up and snapped them into the deflector.
Okay thank you for that, you got a picture as to how they attach?
 
I think they are supposed to go between the weather stripping (rubber seal) and the metal door frame......
I just finished installing these, on an easy to hard scale, I'd give it a "1" super easy. The only tricky part, as mentioned by "Reidog" are the little clips.

Step 1 - Clean the outside door frame with an alcohol prep pad.
Step 2 - Roll down the window.
Step 3 - Pull the window channel rubber seal from the upper and fwd portions (just an inch or so)
Step 4 - Test fit the guard with the white plastic still on the foam adhesive strips, once you're comfortable, peel back the fwd green pull tab about 1/2" and fold it 90 degrees (so it sticks straight up), repeat for the trailing green pull tab. Remove the two small white plastic pieces on the rear of the guard. Place the forward edge (rearview mirror end) making sure to get the very tiny tab behind the mirror trim plate. I used my fingers to align the top / rear edge and put a slight forward push on the guard while checking the leading edge (closest to the mirror) was also aligned, then pressed the top / trailing edge onto the door frame then the bottom, making sure the adhesive stuck.

Then I moved to the forward leading edge (closest to the mirror) and started pulling the white plastic strip (this is why I made the 90 fold) at the same time I made sure the top edge was aligned as I worked my way back to the trailing edge. Making sure I pressed the entire length of the guard to ensure the adhesive strip made good contact with the door frame.

Step 5 - Take the little plastic clips, pull the window rubber out of the way and snap it onto the rain guard and it will almost self align to the metal window frame. Push the rubber back into place and roll up the window.
 

Attachments

  • Rain Guards.jpg
    Rain Guards.jpg
    68.3 KB · Views: 12
I just finished installing these, on an easy to hard scale, I'd give it a "1" super easy. The only tricky part, as mentioned by "Reidog" are the little clips.

Step 1 - Clean the outside door frame with an alcohol prep pad.
Step 2 - Roll down the window.
Step 3 - Pull the window channel rubber seal from the upper and fwd portions (just an inch or so)
Step 4 - Test fit the guard with the white plastic still on the foam adhesive strips, once you're comfortable, peel back the fwd green pull tab about 1/2" and fold it 90 degrees (so it sticks straight up), repeat for the trailing green pull tab. Remove the two small white plastic pieces on the rear of the guard. Place the forward edge (rearview mirror end) making sure to get the very tiny tab behind the mirror trim plate. I used my fingers to align the top / rear edge and put a slight forward push on the guard while checking the leading edge (closest to the mirror) was also aligned, then pressed the top / trailing edge onto the door frame then the bottom, making sure the adhesive stuck.

Then I moved to the forward leading edge (closest to the mirror) and started pulling the white plastic strip (this is why I made the 90 fold) at the same time I made sure the top edge was aligned as I worked my way back to the trailing edge. Making sure I pressed the entire length of the guard to ensure the adhesive strip made good contact with the door frame.

Step 5 - Take the little plastic clips, pull the window rubber out of the way and snap it onto the rain guard and it will almost self align to the metal window frame. Push the rubber back into place and roll up the window.
Let's see how they look
 
Back
Top