Hope you feel better soon!!… I haven't been myself lately since that 90 mph impact joggled my cranial cavity.
I think all the air leaked out, so I need to recharge after I find the hole and plug it.
Navigation
Install the app
How to install the app on iOS
Follow along with the video below to see how to install our site as a web app on your home screen.
Note: This feature may not be available in some browsers.
More options
You are using an out of date browser. It may not display this or other websites correctly.
You should upgrade or use an alternative browser.
You should upgrade or use an alternative browser.
12 volt battery is important!-maybe an issue summary for error messages?
- Thread starter McCloud_Rainbow
- Start date
Thank you so much!Hope you feel better soon!!
Hopefully LC's won't need to go down this route, but a lot of pure EV's out there carry around a jump pack in their frunk to jumpstart the 12v when/if it dies. Seems crazy that they die in a car with a much larger traction battery, but the charging logic of a lot of these cars limits the number of times the 'big' battery can top off the 'little' battery while they are parked. Once it hits the limit, you're done. It assumes there is something wrong with the 12v battery. There is no way in most of these cars to 'jump' from the big battery to the 12v.
I've found in both of the EV's I've owned that putting in an AGM battery mitigated these issues as the AGM is much more tolerant of the voltage swings. My wife's EV6 has a jump pack in the frunk, but thankfully hasn't had to use it!
I've found in both of the EV's I've owned that putting in an AGM battery mitigated these issues as the AGM is much more tolerant of the voltage swings. My wife's EV6 has a jump pack in the frunk, but thankfully hasn't had to use it!
- Moderator
- #25
It is a flooded lead/acid battery.Do we know what type of battery the 12 volt battery is? Flooded Lead acid, AGM, Gel, lithium?….
Well dangit, since flooded lead/acid batteries take a different charge profile than an AGM, I guess I won’t be replacing the stock battery with an AGM.It is a flooded lead/acid battery.
- Moderator
- #27
I've never had an issue with going to an AGM in other vehicles I've owned.Well dangit, since flooded lead/acid batteries take a different charge profile than an AGM, I guess I won’t be replacing the stock battery with an AGM.
Has anyone installed an Odyssey battery in their Landcruiser yet? Have run them in my 4Runners and GX470.
My truck has been sitting in the garage for 12 days and I wanted to get a battery tender on it. At 5pm or so connected a battery charger/maintainer directly into the battery and it showed 52%. Overnight it is at 100%, and it shifted automatically to maintenance mode. Will leave that connected for the next few weeks since it wont be driven for some time..
I had noted this and other threads re: 12v Cranking Battery. A couple of reports of low battery voltage/parasitic drain/and possibly causing engine cranking and electronics issues, towing to dealer, etc.
My 2 week old 500mile LC/LC has no issues, however this vehicle may be parked at brief intervals for 2-4- weeks waiting for me. I always place battery tenders on non-daily driven vehicles: motorcycles, cars, boat, Mule, etc. I decided to install a tender to my LC.
Here is what is a bit interesting: Measured voltages before/after:
Before: @ Battery 12.4v. @ Jump terminal 12.37v
Finished pigtail: voltage at grille 12.38v
Plug in battery tender 750ma version/red light-charging
2 hrs later still red
16 hrs later 13.18v at pigtail, charger still red
20 hrs later finally turned green. Pigtail battery voltage 13.20
Just some data points if you are considering intermittent storage.
HTony
Some detail on wiring if interested:
I made a pigtail from an old battery tender battery jump-clamp cord, cut off the clamps and soldered ring terminals. Left the in-line 7.5amp fuse. Use heat-shrink tubing to cover all connections. Check carefully your polarity! Screwed ring terminals onto the (+) jump start bolt in under-hood fuse box and the (-) onto a nearby firewall grounding bolt. Fished it out thru lower front grille, zip-tie and tuck it away when not used. Not really necessary to remove radiator cowl. 2 hour job.
Attachments
Can you show us where you connected the charging wires to under the hood?? Pretty please??I had noted this and other threads re: 12v Cranking Battery. A couple of reports of low battery voltage/parasitic drain/and possibly causing engine cranking and electronics issues, towing to dealer, etc.
My 2 week old 500mile LC/LC has no issues, however this vehicle may be parked at brief intervals for 2-4- weeks waiting for me. I always place battery tenders on non-daily driven vehicles: motorcycles, cars, boat, Mule, etc. I decided to install a tender to my LC.
Here is what is a bit interesting: Measured voltages before/after:
Before: @ Battery 12.4v. @ Jump terminal 12.37v
Finished pigtail: voltage at grille 12.38v
Plug in battery tender 750ma version/red light-charging
2 hrs later still red
16 hrs later 13.18v at pigtail, charger still red
20 hrs later finally turned green. Pigtail battery voltage 13.20
Just some data points if you are considering intermittent storage.
HTony
Some detail on wiring if interested:
I made a pigtail from an old battery tender battery jump-clamp cord, cut off the clamps and soldered ring terminals. Left the in-line 7.5amp fuse. Use heat-shrink tubing to cover all connections. Check carefully your polarity! Screwed ring terminals onto the (+) jump start bolt in under-hood fuse box and the (-) onto a nearby firewall grounding bolt. Fished it out thru lower front grille, zip-tie and tuck it away when not used. Not really necessary to remove radiator cowl. 2 hour job.
- Moderator
- #34
The easiest way would be put the POS wire on the existing stud (just add another nut) beside the Jumper Cable point and the NEG wire on any body bolt.Can you show us where you connected the charging wires to under the hood?? Pretty please??
Thank you so much!! Now I just need another pigtail that will plug into my battery charger/maintainer.The easiest way would be put the POS wire on the existing stud (just add another nut) beside the Jumper Cable point and the NEG wire on any body bolt.
View attachment 25913
EODguy is the master and he is correct above! I decided to take some photos below.
Manual p 622 shows the front jumping points. Some more hints:
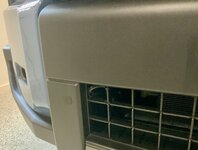
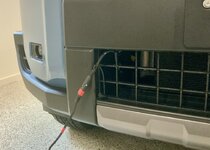
Prepare your cable, needs to be 65-68”. May have to splice for length, I had 12 ga red/black wire in my shop. Route the cable along the right fender, around & behind the R headlight and seek an opening to the front grille. Do all this first
Negative terminal: there are a few options but I separated the cable and routed the negative lead along the right fender to an obvious grounding lug below the R hood hinge.
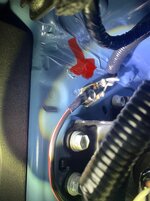
Positive terminal: Under the hood Locate the black “fuse box” on the right passenger side. There you will see a small red lift-up cover over the “positive: jump terminal. Right next to that is a bolt pointed upwards (I think it is a 10metric, you will need to source it). Shape your positive cable ring terminals with a right-angle bend, slip it over, bolt and tighten it. Replace fuse box cover and of course, tidy up wiring with zip ties if necessary.
This will be a “live” battery pigtail so I recommend a jumper cable with a fuse and an end-cap.
Manual p 622 shows the front jumping points. Some more hints:
Prepare your cable, needs to be 65-68”. May have to splice for length, I had 12 ga red/black wire in my shop. Route the cable along the right fender, around & behind the R headlight and seek an opening to the front grille. Do all this first
Negative terminal: there are a few options but I separated the cable and routed the negative lead along the right fender to an obvious grounding lug below the R hood hinge.
Positive terminal: Under the hood Locate the black “fuse box” on the right passenger side. There you will see a small red lift-up cover over the “positive: jump terminal. Right next to that is a bolt pointed upwards (I think it is a 10metric, you will need to source it). Shape your positive cable ring terminals with a right-angle bend, slip it over, bolt and tighten it. Replace fuse box cover and of course, tidy up wiring with zip ties if necessary.
This will be a “live” battery pigtail so I recommend a jumper cable with a fuse and an end-cap.
Attachments

Thank you so very much!EODguy is the master and he is correct above! I decided to take some photos below.
Manual p 622 shows the front jumping points. Some more hints:
Prepare your cable, needs to be 65-68”. May have to splice for length, I had 12 ga red/black wire in my shop. Route the cable along the right fender, around & behind the R headlight and seek an opening to the front grille. Do all this first
Negative terminal: there are a few options but I separated the cable and routed the negative lead along the right fender to an obvious grounding lug below the R hood hinge.
Positive terminal: Under the hood Locate the black “fuse box” on the right passenger side. There you will see a small red lift-up cover over the “positive: jump terminal. Right next to that is a bolt pointed upwards (I think it is a 10metric, you will need to source it). Shape your positive cable ring terminals with a right-angle bend, slip it over, bolt and tighten it. Replace fuse box cover and of course, tidy up wiring with zip ties if necessary.
This will be a “live” battery pigtail so I recommend a jumper cable with a fuse and an end-cap.
- Moderator
- #38
Perfect way to run it through the grill!EODguy is the master and he is correct above! I decided to take some photos below.
Manual p 622 shows the front jumping points. Some more hints:
Prepare your cable, needs to be 65-68”. May have to splice for length, I had 12 ga red/black wire in my shop. Route the cable along the right fender, around & behind the R headlight and seek an opening to the front grille. Do all this first
Negative terminal: there are a few options but I separated the cable and routed the negative lead along the right fender to an obvious grounding lug below the R hood hinge.
Positive terminal: Under the hood Locate the black “fuse box” on the right passenger side. There you will see a small red lift-up cover over the “positive: jump terminal. Right next to that is a bolt pointed upwards (I think it is a 10metric, you will need to source it). Shape your positive cable ring terminals with a right-angle bend, slip it over, bolt and tighten it. Replace fuse box cover and of course, tidy up wiring with zip ties if necessary.
This will be a “live” battery pigtail so I recommend a jumper cable with a fuse and an end-cap.
I opted to leave it under hood. I plug in the charger, place it in the engine compartment along with the extension cord plug, close the hood and drape the extension cord over the driver's mirror.
1 - keeps the charger and cord weather proof.
2 - Keeps me from driving off with the extension cord still attached (don't ask why I think this is super important).
Similar threads
- Replies
- 8
- Views
- 6K


