Installation of Roam Rugged Case on First Edition Roof Rack

PixelMagic

Well-known member
📛 Founding Member
Apr 9, 2024
169
Media
81
454
Pasadena, California
Vehicles
Land Cruiser First Edition
Thought I would share this in case it helps someone thinking of this product.

Installation of 95L Roam Rugged case on First Edition Roof Rack using the 95L Roam Rugged Mounts.
  • The First Edition Roof Rack needs 5/16" carriage bolts: the Roam carriage bolts are too small for the T rails.
    • Use 5/16" diameter by 3/4" long carriage bolts. If the bolt is too long, it will hit the bottom of the case.

    • IMG_7357.jpg
  • The Roam Rugged Mount slots are just under a mm too tight for the proper sized carriage bolt, but it is easy to widen slightly with a Dremel. Be sure to Dremel enough to let the bolt screws pass easily.
    • These pictures show where to widen to accommodate the bolts for the Front and Back Mounts.
Front
IMG_7356.jpg


Back
IMG_7355.jpg


  • For the back, use a Torx wrench to move one of the cross bars to the back.
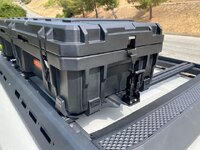
Very secure and lockable clamp mechanism at either end.

IMG_7370.JPG


IMG_7371.JPG


IMG_7369.JPG


IMG_7368.JPG
 

Attachments

  • IMG_7370.JPG
    IMG_7370.JPG
    101.7 KB · Views: 71
Nice set-up. Thanks. Now all we need is a nice functional (flat steps/rungs) folding ladder that won't eliminate access to the rear window. I wish they'd put a sliding rear window (a-la-4Runner) so a Wescott ladder would work. Hoping some after-market company will develop a good set-up soon.
 
Thought I would share this in case it helps someone thinking of this product.

Installation of 95L Roam Rugged case on First Edition Roof Rack using the 95L Roam Rugged Mounts.
  • The First Edition Roof Rack needs 5/16" carriage bolts: the Roam carriage bolts are too small for the T rails.
    • Use 5/16" diameter by 3/4" long carriage bolts. If the bolt is too long, it will hit the bottom of the case.

    • View attachment 7242
  • The Roam Rugged Mount slots are just under a mm too tight for the proper sized carriage bolt, but it is easy to widen slightly with a Dremel. Be sure to Dremel enough to let the bolt screws pass easily.
    • These pictures show where to widen to accommodate the bolts for the Front and Back Mounts.
Front
View attachment 7244

Back
View attachment 7246

  • For the back, use a Torx wrench to move one of the cross bars to the back.
Very secure and lockable clamp mechanism at either end.

View attachment 7251

View attachment 7252

View attachment 7256

View attachment 7257
Tire specs and name please. Any rubbing when off-roading?
 
Tire specs and name please. Any rubbing when off-roading?
They are BF Goodrich KO3's: LT285/65/R18; Load Range E, 125/122S, M+S 3PMSF snow rated tires. No rubbing around town or with some light off-roading. I'll be testing them on more serious terrain this Sunday-Monday in the Mojave desert. I'll report back if they rub, but I doubt there will be any issues.

They look and feel great on the road!
This is great info I'm finally locked in with 285/65/R18 stock rims. Keep me posted please after your Movaje desert trip. I cant wait to go tire shopping :)
 
Back
Top