- Moderator
- #21
sorry, I haven't run across it yet.Do you know what the face plate part number is?
Follow along with the video below to see how to install our site as a web app on your home screen.
Note: This feature may not be available in some browsers.
sorry, I haven't run across it yet.Do you know what the face plate part number is?
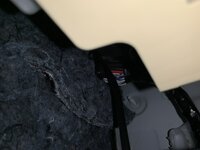
Looks like it is 55405-60650? (#6 in the image).Do you know what the face plate part number is?
")
This is likely not the right thread to ask in, but since you got that cover plate off, can you tell me how? I couldn't figure it out.I finally set out to install a IC-2730A in my 1958. I put it in the same place discussed earlier.
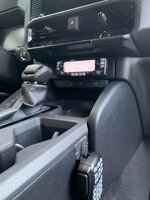
I figured out that you can easily pass a FLAT 6 conductor RJ-12 cable trough the switch blanks on the panel that pops out. I had a few of these laying around. This is for the control head:
View attachment 28852
I attached the MB-5 mounting plate for the Icom with velcro, we'll see how long that holds.
View attachment 28853
If you place the cable correctly, the jack for the cable on the control head lines right up with where the RJ-12 pokes out of the panel:
View attachment 28854
The radio brick is under the passenger seat. The control cable runs down the passenger side of the center console and along to where it can be run under the seat. The sides of the console near the dash pop off pretty easily. This video has a lot of examples of trim removal.
The 12 gauge power cable runs under trim to the back where the battery is. Didn't take long to do that at all.
For the Antenna, I ordered a set of ditch light brackets from @MandRautomotive and drilled a NMO-size hole (3/4") for a Larsen NMO mount. This bracket replaces the flat black trim next to the Cowl. M&R has a video on youtube that describes how to install these brackets.
I figured out that there would be enough clearance most likely for an NMO mount underneath the ditch light bracket when installed, especially with a spacer. So I took a bit of a chance.
View attachment 28855
I drilled a 3/4" hole for the NMO mount with a step bit. I was just under 1/8 inch off where I actually needed to be, but it turned out to be close enough.
View attachment 28856
Anyway, the coax runs out the back of the bracket like you see in the above photo- and there is just enough room to route it underneath the hood from the rear. I soldered a ground wire to the base of the NMO mount since the ditch light bracket is coated and would make for a crappy ground point. There is a very handy existing ground bolt attached to the body close by that I loosened a bit and attached the ground wire (green) to with a spade lug. (And coated with conductive penetrox)
The underside of the NMO mount is protected form the weather with coax seal.
View attachment 28857
The coax runs through the grommet in the back of this photo and it zip-tied to that loom you see running from the cowl. I punched out the middle of the grommet and ran the coax through it.... Slowly, it was tight.
View attachment 28858
The coax comes in behind the dash. All you really need to pull off is the piece under the passenger side dash that covers the fuse box etc. below the glove box. The coax is run underneath the door sill trim. Here is a photo taken from the floorboard looking up.
View attachment 28902
Here's what the antenna install looks like fastened-up. Antenna is a older Diamond NR73B:
View attachment 28859
View attachment 28860
I have drilled several holes in cars for antennas (been a Ham over 30 years) but couldn't bring myself to do it on my Land Crusher. I have a Gen 2 Tacoma with 3 NMO holes in it.
Anyways I don't like lip mounts or mag mounts, and didn't want to run the coax under the lift gate weather seal or something like that. So I figured my best bet was to mount near the fender somehow and run the coax through the factory holes in the firewall plugged up by those grommets. I started looking at ditch light brackets, because that is the obvious place to mount an antenna near the fender on this vehicle. There are a few other fabricators making light brackets that go in the same place, but I went with M&R because the design was simpler and looked closer to stock.
To Do:
Get a Black M6 bolt for the ditch light bracket, it came with a stainless one and looks a bit off. Will also add a black washer to the bolt holding the bracket on to help keep the weather out better.
This is likely not the right thread to ask in, but since you got that cover plate off, can you tell me how? I couldn't figure it out.

Fantastic, thanks for the pics. I'll give it a shot.I start on the R/H side, get that popped, the center bottom and finally the L/H side
View attachment 29002View attachment 29001
Could you please shed some light on how you routed the power from under the seat to the battery in the back? What route did you take? Any pics or detailed info there would be tremendously helpful, thank you!I finally set out to install a IC-2730A in my 1958. I put it in the same place discussed earlier.
I figured out that you can easily pass a FLAT 6 conductor RJ-12 cable trough the switch blanks on the panel that pops out. I had a few of these laying around. This is for the control head:
View attachment 28852
I attached the MB-5 mounting plate for the Icom with velcro, we'll see how long that holds.
View attachment 28853
If you place the cable correctly, the jack for the cable on the control head lines right up with where the RJ-12 pokes out of the panel:
View attachment 28854
The radio brick is under the passenger seat. The control cable runs down the passenger side of the center console and along to where it can be run under the seat. The sides of the console near the dash pop off pretty easily. This video has a lot of examples of trim removal.
The 12 gauge power cable runs under trim to the back where the battery is. Didn't take long to do that at all.
For the Antenna, I ordered a set of ditch light brackets from @MandRautomotive and drilled a NMO-size hole (3/4") for a Larsen NMO mount. This bracket replaces the flat black trim next to the Cowl. M&R has a video on youtube that describes how to install these brackets.
I figured out that there would be enough clearance most likely for an NMO mount underneath the ditch light bracket when installed, especially with a spacer. So I took a bit of a chance.
View attachment 28855
I drilled a 3/4" hole for the NMO mount with a step bit. I was just under 1/8 inch off where I actually needed to be, but it turned out to be close enough.
View attachment 28856
Anyway, the coax runs out the back of the bracket like you see in the above photo- and there is just enough room to route it underneath the hood from the rear. I soldered a ground wire to the base of the NMO mount since the ditch light bracket is coated and would make for a crappy ground point. There is a very handy existing ground bolt attached to the body close by that I loosened a bit and attached the ground wire (green) to with a spade lug. (And coated with conductive penetrox)
The underside of the NMO mount is protected form the weather with coax seal.
View attachment 28857
The coax runs through the grommet in the back of this photo and it zip-tied to that loom you see running from the cowl. I punched out the middle of the grommet and ran the coax through it.... Slowly, it was tight.
View attachment 28858
The coax comes in behind the dash. All you really need to pull off is the piece under the passenger side dash that covers the fuse box etc. below the glove box. The coax is run underneath the door sill trim. Here is a photo taken from the floorboard looking up.
View attachment 28902
Here's what the antenna install looks like fastened-up. Antenna is a older Diamond NR73B:
View attachment 28859
View attachment 28860
I have drilled several holes in cars for antennas (been a Ham over 30 years) but couldn't bring myself to do it on my Land Crusher. I have a Gen 2 Tacoma with 3 NMO holes in it.
Anyways I don't like lip mounts or mag mounts, and didn't want to run the coax under the lift gate weather seal or something like that. So I figured my best bet was to mount near the fender somehow and run the coax through the factory holes in the firewall plugged up by those grommets. I started looking at ditch light brackets, because that is the obvious place to mount an antenna near the fender on this vehicle. There are a few other fabricators making light brackets that go in the same place, but I went with M&R because the design was simpler and looked closer to stock.
To Do:
Get a Black M6 bolt for the ditch light bracket, it came with a stainless one and looks a bit off. Will also add a black washer to the bolt holding the bracket on to help keep the weather out better.
Could you please shed some light on how you routed the power from under the seat to the battery in the back? What route did you take? Any pics or detailed info there would be tremendously helpful, thank you!
Yes, it looks difficult and time consuming. One more question: Did you fish the power cable using one of those drywall fishing rods? Or you actually took panels off? Or both?Yeah sure. Here are some terribly drawn diagrams. I am going to find a piece of trim to hide the wire and coax coming from under the seat eventually:
View attachment 29664
View attachment 29665
View attachment 29666
View attachment 29667
Pull up the tool compartment cover, the compartment pieces and you can see where the wire can be fished from the driver side rear seat area
View attachment 29668
It looks a lot harder than it is.
It really wasn't time consuming at all. It took me longer to fish the coax through the grommet for the firewall.Yes, it looks difficult and time consuming. One more question: Did you fish the power cable using one of those drywall fishing rods? Or you actually took panels off? Or both?
I am thinking about mounting the antenna in the back on the trunk door like the Ed Martin Toyota guy so I need to figure out how to do that.
Thank you for explaning all this. Yes, I agree the antenna location isn't ideal since quarter side is blocked by the car's body. I plan to put it higher up on the glass hatch and fold it along the light bar when not in use. Or, I can get a shorter antenna that sticks out a little bit above the roof line.It really wasn't time consuming at all. It took me longer to fish the coax through the grommet for the firewall.
For the most part, all I used was a small trim tool to push the 12 guage power wire up under the trim. The only place I actually removed any trim was in the back to get he wire into the battery compartment as shown in the last photo. Otherwise the wire can just be pushed under the trim, or sometimes use the tool to pry the trim up a little so the wire can be squeezed under. I bet it took less than 10-15 minutes to run the power cable.
I think the Ed Martin Cruiser likely has the coax running inside the hatch trim on the passenger side, then up inside the hatch, through the boot near at the top of the truck then over the headliner to the A pillar. Then down the A pillar to under the seat. I would never mount an antenna in that location though.
If you are already pushing a coax through the firewall, why not add a wire and tap into the Dvr's side fuse box.
View attachment 29730
Yeah I mean it will still work but your VSWR might be high with the antenna that close to the sheet metal. If you mostly care about talking to folks nearby when off-roading it probably doesn't matter much.Thank you for explaning all this. Yes, I agree the antenna location isn't ideal since quarter side is blocked by the car's body. I plan to put it higher up on the glass hatch and fold it along the light bar when not in use. Or, I can get a shorter antenna that sticks out a little bit above the roof line.
You're right. I just picked up K400SNMO to test fit the bracket on the rear tailgate, with a 40" whip, it's the same height if I were to mount it like you did—next to the A piller on the passenger side. So, I might as well put it in the front. I will comb through your instructions once again for the antenna fit. Thank you sir.Yeah I mean it will still work but your VSWR might be high with the antenna that close to the sheet metal. If you mostly care about talking to folks nearby when off-roading it probably doesn't matter much.