Open hatch window from inside

jenos96

Active member
📛 Founding Member
Sep 6, 2024
165
Media
27
199
Denver
Vehicles
Land Cruiser
I like to car camp and am actually a fan of the flip up window for those rainy days. But like hell am I getting outside to open it in the rain. Can a button be installed inside?

On a related note, are there struts that will hold their position rather than always opening fully? Ergo hold the window ajar
 
I don't think so, but if you close it lightly, it won't latch. As for your second question, you could probably just stick a small spacer on the window sill so it stays open a crack.
 
I don't think so, but if you close it lightly, it won't latch. As for your second question, you could probably just stick a small spacer on the window sill so it stays open a crack.
Search the FJ cruiser forums. They had the same challenges with the rear window.
 
Not sure how well it worked but when I had my FJ there was a company that made a kit that replaced the side {port hole} windows. For the life of me I can't remember the name. It was a complete kit that had a pop out latch pretty cool not sure if it worked well or not.
 
I don’t understand. Why can’t you just use remote to open it? My challenge is to flip the rear windshield up and down. (and lock it from inside)
 
From what I read elsewhere, It seems @EOD Guy is already on the case and has something on the works for this problem of opening the back from the inside while car camping. He has reliably come up with well thought out, well implemented, aesthetically pleasing solutions, so I'd start a collaboration with him.
I'm sure whatever results from such collaboration would be of immense benefit to all here.
 
I like to car camp and am actually a fan of the flip up window for those rainy days. But like hell am I getting outside to open it in the rain. Can a button be installed inside?

On a related note, are there struts that will hold their position rather than always opening fully? Ergo hold the window ajar
It is possible to add an inside switch to open the glass (I'm working on mine now).

As far as the struts, simple answer is no. I plan on using a piece of para cord (haven't tried yet) as a limit strap.

I also plan on installing a hatch opening switch. I am waiting on an eBay purchase to arrive.
 
It is possible to add an inside switch to open the glass (I'm working on mine now).

As far as the struts, simple answer is no. I plan on using a piece of para cord (haven't tried yet) as a limit strap.

I also plan on installing a hatch opening switch. I am waiting on an eBay purchase to arrive.
Please share your process when done! I was quotes $300 from a shop to have this mod done!
 
(Edit) the procedure in this post will only pop the glass lock if the doors are unlocked. See post #28 for my solution to get it to pop with the doors locked.

So doing this mod will be super easy on a scale of 1-10 about a 2, that's because you have to remove the rear hatch trim panel.

You will need a momentary switch and some 20g-22g wires. This is my current choice of switch, but that might change


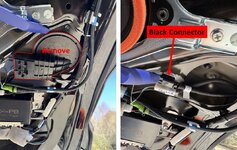
1 - remove the rear hatch trim panel.
2 - remove the black cover panel (red dashed line)
3 - splice in to the "glass hatch wires" It's the black connector (it shouldn't matter which side of the connector you tap into). The Wht/Blk & Blk wires lead to the lock and the Blk & Red wires lead to the switch.

If you unplug the black connector and place a jumper across the Wht/Blk and Blk wires it will pop the glass opener. Note: the hatch has to be in the full down and locked position. Messing around for 30 min before I figured this out......LOL

I haven't actually decided where I'm going to put the switch as I'm awaiting a "Rear Hatch Opener" switch and will decide where both switches will go.
 

Attachments

  • Glass hatch mod 3.jpg
    Glass hatch mod 3.jpg
    226.1 KB · Views: 87
Last edited:
So doing this mod will be super easy on a scale of 1-10 about a 2, that's because you have to remove the rear hatch trim panel.

You will need a momentary switch and some 20g-22g wires. This is my current choice of switch, but that might change


1 - remove the rear hatch trim panel.
2 - remove the black cover panel (red dashed line)
3 - splice in to the "glass hatch wires" It's the black connector (it shouldn't matter which side of the connector you tap into). The Wht/Blk & Blk wires lead to the lock and the Blk & Red wires lead to the switch.

If you unplug the black connector and place a jumper across the Wht/Blk and Blk wires it will pop the glass opener. Note: the hatch has to be in the full down and locked position. Messing around for 30 min before I figured this out......LOL

I haven't actually decided where I'm going to put the switch as I'm awaiting a "Rear Hatch Opener" switch and will decide where both switches will go.
This is perhaps a dumb question but I’ve 0 experience dealing with electronics: how are you splicing in? Are you severing the black and red wire and splicing into the new button, or just exposing the copper of the black/red and splicing into that? Or does it even matter?
 
This is perhaps a dumb question but I’ve 0 experience dealing with electronics: how are you splicing in? Are you severing the black and red wire and splicing into the new button, or just exposing the copper of the black/red and splicing into that? Or does it even matter?
There are a several of ways.......

1- Strip back the insulation (don't cut the wire) all the way around the wire, wrap the new wire around the bared wire, then solder the connection, then insulate.

2- Cut the OEM wire, strip back the insulation on both halves, (put heat shrink on to one of the OEM wires) twist the new wire on to one of the OEM halves, put the twisted wires into one side of a butt connector and crimp, then place the other half of the OEM wire in to the other side of the butt connector and crimp, slide the heat shrink over the entire butt connector and wires, heat the heat shrink.

3- Use some "Posi- taps" : https://www.amazon.com/Posi-Tap-Connectors-Electrical-Fastener-INCLUDED/dp/B01HSBYX3I/ref=sr_1_2?crid=1ZAH4IDNMGHVY&dib=eyJ2IjoiMSJ9.boZ6rW7F9FopEG1Dzi5FfiZUsF7vdwqV-p1aFjBHzNA3ojShNpcfWglzIYHTdzIlkjYApOoI6Mcrh2DgfExfcfsfaZVpW0lJUr04kX73zBt9cL22o67cp07GxEw8ggd5Sfx51luPrDvUpIHHKikSBUSG8Q9O_bCeDNDWSSp-BgvfrbxLfwLRV06L8x3IM7014tgyXGUR6w0udaA8cX-KMeGi6ZIv5naN_iASFCyrMfM.-azwH1po2NNHU-qfsyBA9FOYLqS8o2Tj-1uli9DNtTk&dib_tag=se&keywords=posi+taps+18-24+gauge&qid=1733518170&sprefix=posi+,aps,136&sr=8-2

4- Buy OEM connectors and pins and make a "break-out" harness.
 
There are a several of ways.......

1- Strip back the insulation (don't cut the wire) all the way around the wire, wrap the new wire around the bared wire, then solder the connection, then insulate.

2- Cut the OEM wire, strip back the insulation on both halves, (put heat shrink on to one of the OEM wires) twist the new wire on to one of the OEM halves, put the twisted wires into one side of a butt connector and crimp, then place the other half of the OEM wire in to the other side of the butt connector and crimp, slide the heat shrink over the entire butt connector and wires, heat the heat shrink.

3- Use some "T" taps : https://www.amazon.com/Posi-Tap-Connectors-Electrical-Fastener-INCLUDED/dp/B01HSBYX3I/ref=sr_1_2?crid=1ZAH4IDNMGHVY&dib=eyJ2IjoiMSJ9.boZ6rW7F9FopEG1Dzi5FfiZUsF7vdwqV-p1aFjBHzNA3ojShNpcfWglzIYHTdzIlkjYApOoI6Mcrh2DgfExfcfsfaZVpW0lJUr04kX73zBt9cL22o67cp07GxEw8ggd5Sfx51luPrDvUpIHHKikSBUSG8Q9O_bCeDNDWSSp-BgvfrbxLfwLRV06L8x3IM7014tgyXGUR6w0udaA8cX-KMeGi6ZIv5naN_iASFCyrMfM.-azwH1po2NNHU-qfsyBA9FOYLqS8o2Tj-1uli9DNtTk&dib_tag=se&keywords=posi+taps+18-24+gauge&qid=1733518170&sprefix=posi+,aps,136&sr=8-2

4- Buy OEM connectors and pins and make a "break-out" harness.
The T taps seem idiot-proof… now to choose a button
 
The T taps seem idiot-proof… now to choose a button
Those Posi Taps (I edited the name in the orig post) are all I use, the old T Taps can sever the wire. Posi Taps come in all different wire gage sizes, so if you go that route get the right ones for the wire you are using.
 
Those Posi Taps (I edited the name in the orig post) are all I use, the old T Taps can sever the wire. Posi Taps come in all different wire gage sizes, so if you go that route get the right ones for the wire you are using.
Those Posi Taps look good. T Taps are definitely not me proof, I've also cut a small wire trying to use them. Some of the electrical wiring in vehicles these days is remarkably delicate.
 
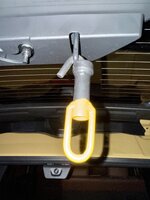
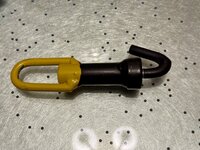
I use one of these (different brand) to keep my FJ's rear window cracked open but lockable (so it doesn't complain if I drive). I haven't checked if it works on the Land Cruiser yet, I can do that tomorrow.

Ventlock Tailgate Lock


Untitleddesign_3_3afda285-b0bf-4d8a-9359-460bd5215dce.png copy.jpg
 
Those look pretty useful. Seems easy enough to make....... Might just have to fab one up.

Thanks for the idea!
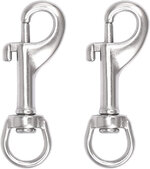
You can also use appropriately sized D ring swivel clips if you don't care about it being lockable. And rattling a lot.
 

Attachments

  • clips.jpg
    clips.jpg
    77.7 KB · Views: 73
So doing this mod will be super easy on a scale of 1-10 about a 2, that's because you have to remove the rear hatch trim panel.

You will need a momentary switch and some 20g-22g wires. This is my current choice of switch, but that might change


1 - remove the rear hatch trim panel.
2 - remove the black cover panel (red dashed line)
3 - splice in to the "glass hatch wires" It's the black connector (it shouldn't matter which side of the connector you tap into). The Wht/Blk & Blk wires lead to the lock and the Blk & Red wires lead to the switch.

If you unplug the black connector and place a jumper across the Wht/Blk and Blk wires it will pop the glass opener. Note: the hatch has to be in the full down and locked position. Messing around for 30 min before I figured this out......LOL

I haven't actually decided where I'm going to put the switch as I'm awaiting a "Rear Hatch Opener" switch and will decide where both switches will go.
Remind me why you aren’t just using the key fob?
 
Back
Top