Grille Light Bar

dtxlcfe

New member
📛 Founding Member
Sep 25, 2024
23
Media
18
18
Dallas
Vehicles
2024 land cruiser 250 FE
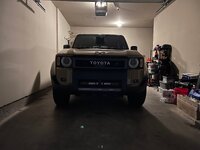
Bringing this post over from the FB group.

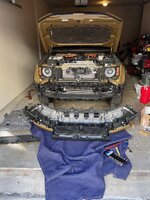
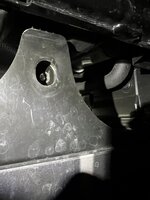
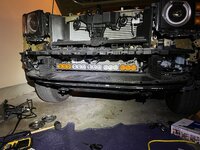
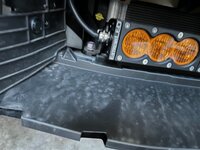
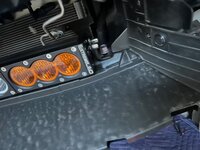
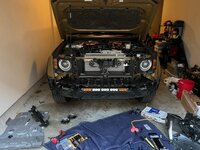
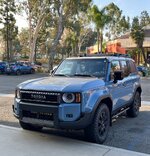
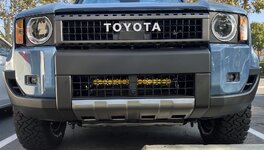
Found the nearest to perfect length light bar for the existing bolts in the lower grill. No drilling or cutting. I just had to dremel the bolt holes a lil bit on the light bar bracket to fit the larger oem bolts through and smack the bracket ends with a mallet a few times to bring into existing bolts width.

This took about 5 hours from start to finish and was a lot of work.

Some tips to help you save time:
1. Don’t start with a cheap $10 harbor freight dremel so you have to bike to Home Depot and get a quality one when it melts.
2. Don’t use an impact, you will snap bolts off.
3. If you have a first edition like mine or other skid plates, put the front on jack stands. I spent more time under the car than I expected.
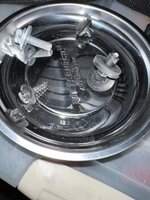
4. Use really really really good bolt organization. I have 1 plastic trim piece and 1 screw left over idk where they go lol.

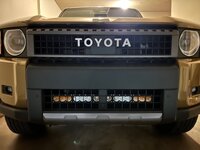
This is the x6 28 inch light bar from extreme LED. They have good discount codes including 15% off when you create an account and 10% rewards for account holders. Their customer service is also extremely amazing when I called a couple times.

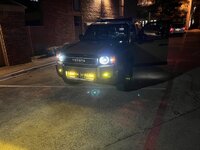
The amber only should look pretty slick at night. I didn’t have the time to do the electrical today but will post some night time pics when I get that done. This one does have 2 separate switches for the outside amber and inside beams.

I plan on having Toyota clean up the broken bolt and left over screw/trim piece when I do my 5000 mile maintenance in about 1000 miles if I cant figure it out but its on there sturdy as OEM with all proximity, cross traffic sensors functioning properly. (I know the left over silver bolt goes on the back part of the front skid plat, was just tired at the end of the night lol)

If anyone wants to detail the front fender flare/wheel well screws and trim pieces for me. maybe I can figure out where those extra 2 pieces go. The Ed Martin headlight replacement video I followed on YT doesn't detail it very well and kinda dark during that part.
 

Attachments

  • IMG_4991.jpg
    IMG_4991.jpg
    747.8 KB · Views: 204
  • IMG_5004.jpg
    IMG_5004.jpg
    647.2 KB · Views: 177
  • IMG_4996.jpg
    IMG_4996.jpg
    328.1 KB · Views: 173
  • IMG_5001.jpg
    IMG_5001.jpg
    200 KB · Views: 186
  • IMG_4999.jpg
    IMG_4999.jpg
    188.6 KB · Views: 183
  • IMG_4995.jpg
    IMG_4995.jpg
    468.2 KB · Views: 166
  • IMG_4994.jpg
    IMG_4994.jpg
    307.5 KB · Views: 156
  • IMG_4993.jpg
    IMG_4993.jpg
    307.1 KB · Views: 168
  • IMG_4992.jpg
    IMG_4992.jpg
    443.4 KB · Views: 176
Wow..lots of work! No wonder shops are charging so much for this. In some cases the labor is more expensive than the parts, especially for a good quality light brand.

Are you hooking up to a panel?
 
Wow..lots of work! No wonder shops are charging so much for this. In some cases the labor is more expensive than the parts, especially for a good quality light brand.

Are you hooking up to a panel?
was thinking about doing an aux beam or something like that but for now I only want to do this bar and some ditch lights so I may just hard wire to the front terminal and use the CH4x4 cube switches in place of the blanks to the left and right of the steering wheel. my goal is to not drill or cut literally anything factory and I know its small but the aux beam would require drilling in the fuse box cover to mount. at least until they come up with a bracket.
You are right about the shops charging a lot for removing the front bumper but it is worlds easier for them having the car up on a lift!
The new Auxbeam switch panels comes with brackets that do not go on top of the fuse box. They can be bolted to the side wall.
 
The new Auxbeam switch panels comes with brackets that do not go on top of the fuse box. They can be bolted to the side wall.
When I run out of blank switch locations I will probably go this route. thanks.
 
This may sound like a very elementary school question so forgive me but where are you hooking the 12v power source to since the battery is in the back of the vehicle? Are you getting it from the fuse box? If so, which one and how many amps? Thank you in advance
 
This may sound like a very elementary school question so forgive me but where are you hooking the 12v power source to since the battery is in the back of the vehicle? Are you getting it from the fuse box? If so, which one and how many amps? Thank you in advance
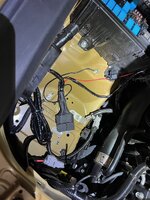
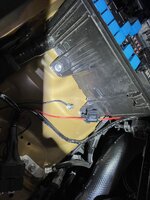
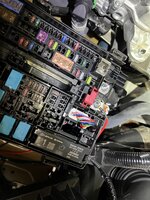
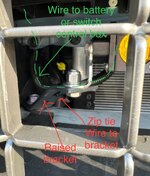
I watched a YT video of another guy doing an auxbeam to the fuse box on the passenger side under the hood. there are 2 power sources there. he said to use the one towards the headlights, that's what i did. not sure he knows what he's talking about but its worked well so far lol. we will see if @EOD Guy can find a problem with it. I also found a pretty nifty spot for the ground wire and light bar relays underneath the air filter. Tested that ground screw with a circuit tester and it seemed to be fine.

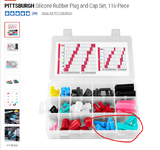
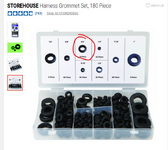
I also found a pretty nifty solution for wiring into the cab through that firewall plug. used the harbor freight grommet kit as EOD guy suggested but I couldn't feed wires through the silicone plugs i got so I used the other little nubbed hose type things it came with. Can upload some pics of that later.


Attachments

  • Screenshot 2024-11-05 081315.png
    Screenshot 2024-11-05 081315.png
    356.1 KB · Views: 97
  • Screenshot 2024-11-05 081408.png
    Screenshot 2024-11-05 081408.png
    372.9 KB · Views: 102
  • IMG_5021.jpg
    IMG_5021.jpg
    412 KB · Views: 103
  • IMG_5012.jpg
    IMG_5012.jpg
    651.7 KB · Views: 102
  • IMG_5014.jpg
    IMG_5014.jpg
    568.7 KB · Views: 94
  • IMG_5015.jpg
    IMG_5015.jpg
    649.3 KB · Views: 100
I watched a YT video of another guy doing an auxbeam to the fuse box on the passenger side under the hood. there are 2 power sources there. he said to use the one towards the headlights, that's what i did. not sure he knows what he's talking about but its worked well so far lol. we will see if @EOD Guy can find a problem with it. I also found a pretty nifty spot for the ground wire and light bar relays underneath the air filter. Tested that ground screw with a circuit tester and it seemed to be fine.

I also found a pretty nifty solution for wiring into the cab through that firewall plug. used the harbor freight grommet kit as EOD guy suggested but I couldn't feed wires through the silicone plugs i got so I used the other little nubbed hose type things it came with. Can upload some pics of that later.
Those power studs are connected together with a buss bar so either will do the same thing. I opted to expand those two, into three. I ran a cable to a 60 amp C/B then into a distribution box (mounted just in front of the air cleaner) then over to the driver's side where there is a lot of room for a relay bank etc......

For the ground connection, there are factory grounding points all over the place on the LC. I normally just piggy back off one of those bolts.
 
I watched a YT video of another guy doing an auxbeam to the fuse box on the passenger side under the hood. there are 2 power sources there. he said to use the one towards the headlights, that's what i did. not sure he knows what he's talking about but its worked well so far lol. we will see if @EOD Guy can find a problem with it. I also found a pretty nifty spot for the ground wire and light bar relays underneath the air filter. Tested that ground screw with a circuit tester and it seemed to be fine.

I also found a pretty nifty solution for wiring into the cab through that firewall plug. used the harbor freight grommet kit as EOD guy suggested but I couldn't feed wires through the silicone plugs i got so I used the other little nubbed hose type things it came with. Can upload some pics of that later.


thank you so much
 
Bringing this post over from the FB group.

Found the nearest to perfect length light bar for the existing bolts in the lower grill. No drilling or cutting. I just had to dremel the bolt holes a lil bit on the light bar bracket to fit the larger oem bolts through and smack the bracket ends with a mallet a few times to bring into existing bolts width.

This took about 5 hours from start to finish and was a lot of work.

Some tips to help you save time:
1. Don’t start with a cheap $10 harbor freight dremel so you have to bike to Home Depot and get a quality one when it melts.
2. Don’t use an impact, you will snap bolts off.
3. If you have a first edition like mine or other skid plates, put the front on jack stands. I spent more time under the car than I expected.
4. Use really really really good bolt organization. I have 1 plastic trim piece and 1 screw left over idk where they go lol.

This is the x6 28 inch light bar from extreme LED. They have good discount codes including 15% off when you create an account and 10% rewards for account holders. Their customer service is also extremely amazing when I called a couple times.

The amber only should look pretty slick at night. I didn’t have the time to do the electrical today but will post some night time pics when I get that done. This one does have 2 separate switches for the outside amber and inside beams.

I plan on having Toyota clean up the broken bolt and left over screw/trim piece when I do my 5000 mile maintenance in about 1000 miles if I cant figure it out but its on there sturdy as OEM with all proximity, cross traffic sensors functioning properly. (I know the left over silver bolt goes on the back part of the front skid plat, was just tired at the end of the night lol)

If anyone wants to detail the front fender flare/wheel well screws and trim pieces for me. maybe I can figure out where those extra 2 pieces go. The Ed Martin headlight replacement video I followed on YT doesn't detail it very well and kinda dark during that part.
Too much works!
My solution is so simple…no bumper removal, no drill, no cuts…just custom made bracket from steel bar (Home depote, or Amazon stuffs). Installation took me 1 hour. Also, the wiring is simple too…to have back lit and main amber light on/off (I had Baja Designs 20” bar)
If someone lives nearby my area, I can help with less cost :) I am a design architect. This is just for fun, but never for living :)
 

Attachments

  • EA98514D-8B39-4966-A8E5-DBF7D61A0058.jpeg
    EA98514D-8B39-4966-A8E5-DBF7D61A0058.jpeg
    532.6 KB · Views: 68
  • 66ECFDEC-B9E8-4C74-A94C-B3765CB7C96B.jpeg
    66ECFDEC-B9E8-4C74-A94C-B3765CB7C96B.jpeg
    270.4 KB · Views: 71
  • 05A00A0F-A133-41EC-9AB3-8D5C5D8A2587.jpeg
    05A00A0F-A133-41EC-9AB3-8D5C5D8A2587.jpeg
    344.7 KB · Views: 66
  • 49EEA384-46C1-4C2B-9F90-955D4538A741.jpeg
    49EEA384-46C1-4C2B-9F90-955D4538A741.jpeg
    287.4 KB · Views: 68
  • 315726DD-60C8-4CBF-B41E-43D387E25CC1.jpeg
    315726DD-60C8-4CBF-B41E-43D387E25CC1.jpeg
    292.7 KB · Views: 69
Last edited:
Too much works!
My solution is so simple…no bumper removal, no drill, no cuts…just custom made bracket from steel bar (Home depote, or Amazon stuffs). Installation took me 1 hour. Also, the wiring is simple too…to have back lit and main amber light on/off (I had Baja Designs 20” bar)
If someone lives nearby my area, I can help with less cost :) I am a design architect. This is just for fun, but never for living :)

I local and would love for some help making a bracket for a light bar.

How did you run the wires to the rack mounted lights and what brackets did you for those lights.

Thanks
 
I custom made myself all the brackets.
About wiring, I did share to all in the forum, please check / search for it.
Please private message me, then we can talk if you need installation/custom brackets.
 
Back
Top