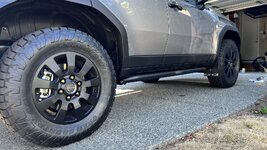
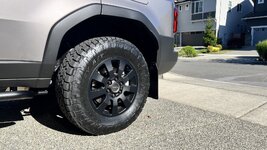
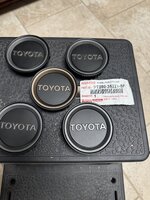
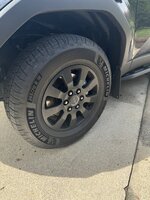
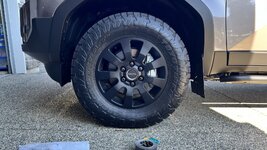
updated center caps stock wheels

Ordered some of the bronze ones, those look nice. Planning to spray paint them with rustoleum metallic flat soft iron, that looks like an almost identical match to the top of the grill. Think i will 3d print a mask to paint them, will see how that goes.
So I thought they would pop off easily like the 5th Gen 4Runner but the LC wheels don’t have the same slot. Has anyone worked out an easy way to get the caps off without removing the wheels? The BAM ones I ordered are arriving tomorrow.
The owners manual shows them just prying off from the outside

1721319172145.png
 
Ordered some of the bronze ones, those look nice. Planning to spray paint them with rustoleum metallic flat soft iron, that looks like an almost identical match to the top of the grill. Think i will 3d print a mask to paint them, will see how that goes.

The owners manual shows them just prying off from the outside

View attachment 5180
Plastic pry tool should get the job done here.
 
Anyone have a link to the plastic pry tool they used? I ordered a pack of Amazon but none of the tools were thin enough to get wedged in. I did try using the beveled end of the wheel remover but that slightly scratches the wheel so don’t want to use that. I even tried ordering suction cups because id seen some videos of that being an easy way, but the suction cups won’t stick to the center cap at all.
 
Anyone have a link to the plastic pry tool they used? I ordered a pack of Amazon but none of the tools were thin enough to get wedged in. I did try using the beveled end of the wheel remover but that slightly scratches the wheel so don’t want to use that. I even tried ordering suction cups because id seen some videos of that being an easy way, but the suction cups won’t stick to the center cap at all.
Did you ever find an easy way to remove the center caps? Usually when I can't find a good plastic pry tool I use the brick separator that comes with LEGO sets.
 
Did you ever find an easy way to remove the center caps? Usually when I can't find a good plastic pry tool I use the brick separator that comes with LEGO sets.
Good to know! I ordered another suction cup if that doesn’t work I’ll try Lego tool
 
Just removed/replaced the center caps using a watch repair tool w/duct tape covering the edge. You should be able to do the same with a small flathead screw driver - just cover the flat edge with some tape to protect from scratching. Took about 10 min to carefully replace all four.

Love the look on Meteor Shower 👍🏼
IMG_8393.jpeg
 

Attachments

  • IMG_8394.jpeg
    IMG_8394.jpeg
    375.2 KB · Views: 371
  • IMG_8395.jpeg
    IMG_8395.jpeg
    398.7 KB · Views: 348
  • IMG_8396.jpeg
    IMG_8396.jpeg
    398.1 KB · Views: 408
Just removed/replaced the center caps using a watch repair tool w/duct tape covering the edge. You should be able to do the same with a small flathead screw driver - just cover the flat edge with some tape to protect from scratching. Took about 10 min to carefully replace all four.

Love the look on Meteor Shower 👍🏼
View attachment 5769
Looks great! On a side note - how do you like the toyos? Any noticeable difference in ride quality, cabin noise, and mpg?
 
Looks great! On a side note - how do you like the toyos? Any noticeable difference in ride quality, cabin noise, and mpg?
Love the Toyos, good ride and still TBD on mileage as I’m in the break in. They’re fairly light compared to competitors and ride is still good on an E load.
 
Love the Toyos, good ride and still TBD on mileage as I’m in the break in. They’re fairly light compared to competitors and ride is still good on an E load.
What are the size specs of those tires if you don’t mind me asking?
 
They’re stock size (265/70r18) in E Load which is 51lb per tire (compared to 55lbs on the KO3). A few lbs more than stock but not too bad.
Also, I think this size is perfect and I wouldn’t want anything bigger. For reference, I’m coming from 35” KO2s on my former Jeep with a 2” lift.
 
These look amazing!! Can wait to see what they look like on, as well.

That Toyota place is getting bombarded with orders! 🙃
 
I can dig it. How did you do it?
On the back side there are two sets of prongs, the inner ring set have to be removed 1st. I placed a paper towel on my kitchen counter (stone) and used a small bladed screw driver (blade was just slightly smaller than the prong), placed the tip (from the center side) at a 30-40 degree angle to the prong and smacked it with a strong force (not a tap) with a small hammer, which started a dent/crease. Rotated the screwdriver to 90 degrees (straight up and down) and gave it 2-3 very hard whacks, burying the tip in the plastic (basically making some room for the prong to come out). I repeated this process for all the inner prongs. I then, with a small hammer, hit the prongs directly with a medium whack, you need to try and drive it straight down as many of them bent over and broke off flush (that wasn't really an issue). Repeat for all the inner prongs. At that point I could tell the disk was coming out and I inserted a larger screwdriver and attempted to pry the disk out. (be careful and don't pry too hard, the disk is flexible). The outer ring(bronze) was easily removed.

After painting and reassembly, I applied super glue to the prongs that had broken off.
 
Last edited:
On the back side there are two sets of prongs, the inner ring set have to be removed 1st. I placed a paper towel on my kitchen counter (stone) and used a small bladed screw driver (blade was just slightly smaller the prong), placed the tip (from the center side) at a 30-40 degree angle to the prong and smacked it with a strong force (not a tap) with a small hammer, which started a dent/crease. Rotated the screwdriver to 90 degrees (straight up and down) and gave it 2-3 very hard whacks, burying the tip in the plastic (basically making some room for the prong to come out). I repeated this process for all the inner prongs. I then, with a small hammer, hit the prongs directly with a medium whack, you need to try and drive it straight down as many of them bent over and broke off flush (that wasn't really an issue). Repeat for all the inner prongs. At that point I could tell the disk was coming out and I inserted a larger screwdriver and attempted to pry the disk out. (be careful and don't pry too hard, the disk is flexible). The outer ring(bronze) was easily removed.

After painting and reassembly, I applied super glue to the prongs that had broken off.
Interesting.
Which paint did you use?
 
Back
Top