Rear Cargo Platform DIY options

BigMF

Well-known member
📛 Founding Member
May 29, 2024
221
Media
62
280
Nashville, TN
Vehicles
2024 Land Cruiser Premium, 2011 Lexus LX570 (Retired)
I'm thinking about building a cargo platform in the back. I did something in my LX570 that while basic, served my purposes. Essentially, after removing the 3rd row, I had multiple M8 bolt locations. I cut a piece of 3/4" plywood using a template made from a large piece of cardboard. However, the with the 250, the seat anchors are no longer there due to the hybrid battery.

There are now (at the time of this post) a couple of options in the aftermarket space, Air Down Gear Up and Goose Gear.

Air Down Gear Up:

1722772874121.png


  1. Logistics
    1. From what I can tell, they use the cargo tie-down hooks to secure their platform.
    2. It appears that the rear storage spaces are sacrificed
    3. Once it's installed, it unlikely you will be taking it in and out quickly.
    4. The platform is pretty elevated so probably not going to be hauling much back there when not overlapping. No dogs, bikes, etc.
  2. Price
    1. "bare minimum" which does not include any drawers, slide out tables, or sleeper option is $2044
    2. Adding a drawer to either side is $900 per drawer
    3. Adding a slide-out table to either side is $450 per table
    4. Adding the sleeper option is another $750
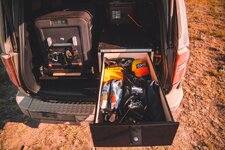
Goose Gear
1722773582543.png


  1. Logistics
    1. Currently, the only option is for a rear "plate". Future plans apparently include a rear seat delete option.
    2. It looks like the rear storage spaces are removed completely and things are attached to extruded aluminum which is attached to ???
    3. While you still have room under the plate and to the sides, there are only certain types of things you could store there that won't roll out every time you open the liftgate.
    4. You could still haul dogs, bikes, etc.
    5. No options (currently) for drawers, slide out tables, sleeper, etc.
  2. Price
    1. $1395

So, with those being the only 2 options, I'll be looking to build my own.....again. I'm blessed that I'm pretty handy and while it might end up as pretty as the options above, I'm unwilling to spend $1400 at a minimum just to get a flat platform to build something on or $3800 to have something with 2 drawers while giving up most of my non-overlanding cargo space.

This build will not happen right away (hopefully over the winter) but I'm putting this thread out there to start the design process and foster ideas from other, like-minded folks. I do have a long overlanding trip coming up in September so I'll come up with a short-term solution and possibly that will generate some information on the design.
 
I look forward to seeing what you come up with. I love fabricating things as well and the design process allows you to customize things exactly the way you want them. I’ve been thinking about how to design a platform that would allow the rear seats to be used if necessary, could accommodate a drawer fridge and when the seats are folded down, have a platform that could fold or slide over the top of the folded seats to allow for sleeping. Reality is I would probably be just fine 99% of the time using our Yeti cooler rather than messing with a fridge but I need to think that through.

Considering Alu Cab Gen 3-R and iKamper 3.0 as possible rooftop tents to complement the setup as well.

I look forward to following your build thread.
 
My thought would be to lay up a carbon fiber panel, similar to the picture above.

I'd start with a 1/8" plywood buck of the exact finished shape, ensuring you have all the nooks and crannies and allow for easy removal.

Cut some carbon fiber pieces (maybe 5-6) the same size as the plywood buck.

Lay a large piece of plastic on the garage floor or wherever you have a level surface. Place your buck on the plastic and cover the buck with an 2nd piece of plastic with a 2-3" of overhang (tape the 2nd piece of plastic to the floor in several place just enough to keep it from moving). Cut a 3rd piece of plastic the same size as the 2nd piece and set aside.

Lay your 1st piece of carbon on the 2nd layer of plastic, Mix enough fiberglass resin to cover the 1st layer of carbon. Use a paint brush to completely cover the carbon and a fiberglass roller to smooth out any air pockets. Add the next layer etc......... when all layers are coated, place the 3rd layer of plastic on top of the wet carbon.

I have used the shop vac to create a vacuum. If you use this method you will need to tape and seal the 2nd and 3rd layers of plastic to create a bag.

I have also used weight to remove all the trapped air. If you use this method you will need a 1/2 or 5/8 sheet of plywood/drywall something flat and sturdy and weight. I used cinder blocks and bricks along with some bags of sandblasting sand. If you go this route the 3rd layer of plastic doesn't need to match the 2nd layer. It is much faster and easier than the vacuum method but requires the fairly even distribution of weight.

Once you have your panel molded you can trim it with wood working tools.

A word of caution! When working/shaping with cured carbon, ALWAYs wear gloves and a particulate air filter mask. Carbon splinters are painful!

Carbon cloth is avail in various widths/lengths. I think I'm still using the 1st roll I ever bought. I had no idea how much is on a 50'X6' roll.

I would use extruded alum to make the risers. There are also hinges that are for the extrusions and if the sub structure were designed right, you'd might be able to still use the existing storage spaces.
 
For the simplest of sleeping platforms, I’ve drawn the most basic 3/4” plywood level platform with a hinge in the middle allowing the “head” section for fold back allowing use of the 2nd row seat. It will be on the passenger side with the seat back folded down, and I plan to add some lock latches on the sides when fully extended out and probably figure a way to tie it down to the kid safety seat points in the backs of the folded seats. I’ll cover it with a black auto carpet material and have an air foam 4” mattress to sleep on top. Pics soon…

IMG_2036.jpeg
 
I plan on using Baltic birch plywood, 3/8” for the top and bottom (maybe even 1/4”, idk), and 3/4” for the risers. Woodcraft stores sell it in 5’ X 5’ sheets. The risers give the two sheets of plywood a stiff and rigid “I Beam” type of strength and rigidity. Festool Domino tenons to join the plywood, using West System Epoxy to bond it all together, and seal the plywood. Draws will also be added later when I find the right full extension draw slides.
 
I got my short-term solution for a cargo platform installed over the weekend. This will serve my purposes for the trip I have coming up in a few weeks and then I'll revisit a longer term solution with data gained from the upcoming trip.

The first step was removing the rear seats. Relatively easy since I'd done it many time before on my 200 series and the steps were exactly the same and even the bolts are the same size (M10/14MM).

I ended up using the 4 bolt locations indicated below to attach some lumber to mount the front platform to. I'm using lumber for now because it's easy to work with and inexpensive (laying around the garage).

1724636465128.png


1724636620620.png
 
In the rear, I used the OEM cargo tie down bolt locations (size M6) and two rivnuts I'd attached to the metal plate over the hybrid battery to attach 1/2" plywood. I attached my fridge slide to the plywood. The cloth covered OEM cargo cover serves as a perfect template for cutting the plywood to fit.

1724636743615.png


Here's the front:

1724636826418.png
 
In the rear, I used the OEM cargo tie down bolt locations (size M6) and two rivnuts I'd attached to the metal plate over the hybrid battery to attach 1/2" plywood. I attached my fridge slide to the plywood. The cloth covered OEM cargo cover serves as a perfect template for cutting the plywood to fit.

View attachment 9519


Here's the front:

View attachment 9520
Looks great! Thanks for sharing. Did you remove the carpeted OEM piece over the hybrid battery and replace it with the wood?
 
Looks great! Thanks for sharing. Did you remove the carpeted OEM piece over the hybrid battery and replace it with the wood?
Thanks!

Yes, I thought about keeping it on there but the flap at the front would have been problematic because I pulled the front cargo tray out to gain a little more room on the front/lower platform.
 
Thanks!

Yes, I thought about keeping it on there but the flap at the front would have been problematic because I pulled the front cargo tray out to gain a little more room on the front/lower platform.
Great job. If no other manufacturers come out with anything over the next 2 months, I'll end up copying your setup.
 
Currently building out a sleeping platform with drawers under it. The slides just arrived today so might be able to get some early pics out this weekend
 
Back
Top