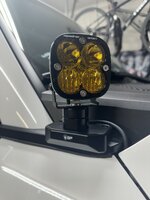
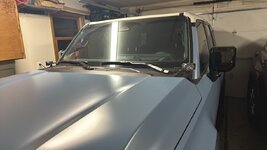
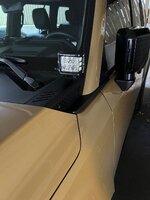
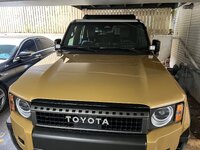
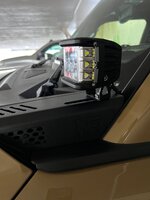
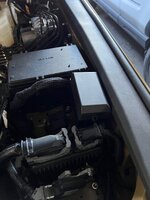
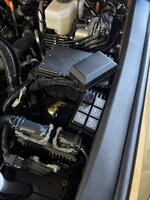
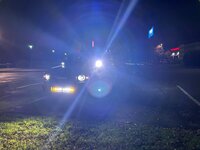
Just got my lights to go with this bracket. How is everyone running the wiring? I'm not seeing a great way to route them that looks clean.
Navigation
Install the app
How to install the app on iOS
Follow along with the video below to see how to install our site as a web app on your home screen.
Note: This feature may not be available in some browsers.
More options
You are using an out of date browser. It may not display this or other websites correctly.
You should upgrade or use an alternative browser.
You should upgrade or use an alternative browser.
Nashfabco - New Ditch Light Brackets & Rear Half Ladder
- Thread starter LouNYC
- Start date
I’m evaluating these billet brackets for Bonobos Products. They feature a cam gear-style swivel mount, seamlessly blending functionality with design. The turret’s aesthetic thoughtfully mirrors the angular contours of the front bumper, creating a cohesive and striking look.

 bonoboproducts.com

Bonobo Products
In Bonobo Products we are committed to our customers to offer you the most innovative accessories and parts for your adventurous lifestyle.
Attachments
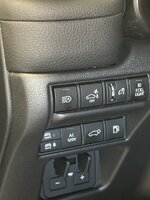
Will do! that auxiliary switch panel is on my list to get as well down the road when I need more button spots. The 3 existing blanks should do for now with my rock lights, light bar and ditch lights.Let us know how it goes with the Relay Box.
I placed an order for square cube switches from Cali. I also ordered 2024 2025 Toyota Landcruiser 250 Auxiliary Upfitter Switch Panel Stock Look off of eBay.
Are you saying this because your wires coming off the ditch lights has a DT plug that wont fit back down through the bracket hole?Just got my lights to go with this bracket. How is everyone running the wiring? I'm not seeing a great way to route them that looks clean.
- Moderator
- #25
Be happy to assist....... from the photo that looks like a relay bank. Most come prewired with one +12v in and one -12v in, without seeing the brand/wiring diagrams I couldn't say for sure. If it has six wires of each color, then it isn't pre-wired.Perhaps @EOD Guy or someone else here can help me figure this out. I know the red common 30 wire is going to my battery but I am not sure where my light +/- and my switch +/- should hook up to these wires. the symbols conflict with what standard relay mapping shows online.
A 99% of 5 wire relays are internally wired the same.
Terminals 85 and 86 are interchangeable as they are for the coil, which moves the contacts. One will be hooked to 12v POS, the other to 12v Neg. One will have a On/Off switch between it and the battery. This switch will be the trigger.
Terminal 30 is referred to as "common" as it will be connected to terminal 78 with the trigger "Off" and it will connect to terminal 87a when the trigger is turned "on".
Terminal 87 is referred to as Normally Closed (NC) as it connects to the common terminal when "No" power is applied to the coil
Terminal 78a is referred to as Normally Open (NO) and only makes contact with the common terminal when power is applied to the coil.
Assuming it's not prewired.............
All the White wires will be hooked to 12v "POS"
All the Black wires will be hooked to switches and become "trigger wires"
This is important! If you don't need the relay to power anything in the "OFF" position Connect the "Ditch light + wire" to the "Red" wire and 12V "POS" to the "Blue" wire. This way the relay is dead when off and there is no power ever on the yellow wire. The Ditch light - wire goes to ground.
or you can hook 12v "POS" to the "Red" wire and remove the Yellow wire.
If you want to power something while the relay is off...... 12v POS to the Red wire which will make the Yellow wire "Hot" when the relay is off...... and the Blue wire "Hot" when the relay is on.
I hope that's not too confusing as I don't know what your skill set is.
Last edited:
Just got my lights to go with this bracket. How is everyone running the wiring? I'm not seeing a great way to route them that looks clean.
I will attach pics tomorrow. My wires are on the backside of the top engine bay and then it routes above the hood hinge on both sides. I then connected through the brackets and the wires are hidden under the bracket except where they come out to attach to the back of the light.Just got my lights to go with this bracket. How is everyone running the wiring? I'm not seeing a great way to route them that looks clean.
- Moderator
- #27
I looked up the relay bank you are using it isn't pre-wired.
This is the one I use........ Two 12V wires in ..... so 3 relays could be wired for "Key On" hot and 3 "always" hot, but I just connect them together) and one ground wire in. There are 6 trigger wires, 6 Normally Open wires and 5 Normally Closed wires. The one higher amp relay doesn't have a NC wire. Just simplifies the wiring a bit. I removed the bottom cover and just removed the "Blue" (NC) wires. Just simplifies the wiring
Here is how I have mine wired: I use relay 2 to Pwr a "Key On" buss Bar so everything is dead when the key is off. The trigger for this relay is taken for the DVR's side under-hood fuse box "Accy" fuse tap.
Last edited:
Got my lights and a dual function switch all mounted and wired together. Pretty happy with the way it all works. Eventually will tap the switch to light up with the dash lights, but for now I can run both the backlight and the main light on the ditch lights.
Attachments
You’re running a dual switch for each ditch light? Niche but hey whatever works. I use that same dual switch for my amber and white function light barGot my lights and a dual function switch all mounted and wired together. Pretty happy with the way it all works. Eventually will tap the switch to light up with the dash lights, but for now I can run both the backlight and the main light on the ditch lights.
I owe you a beer buddy! But mine is wired similarly to the one you sent but it doesn’t combine positives and negatives like yours does so I may return and go that route AmazonI looked up the relay bank you are using it isn't pre-wired.
This is the one I use........ Two 12V wires in ..... so 3 relays could be wired for "Key On" hot and 3 "always" hot, but I just connect them together) and one ground wire in. There are 6 trigger wires, 6 Normally Open wires and 5 Normally Closed wires. The one higher amp relay doesn't have a NC wire. Just simplifies the wiring a bit. I removed the bottom cover and just removed the "Blue" (NC) wires. Just simplifies the wiring
Here is how I have mine wired: I use relay 2 to Pwr a "Key On" buss Bar so everything is dead when the key is off. The trigger for this relay is taken for the DVR's side under-hood fuse box "Accy" fuse tap.
View attachment 20747
It's a dual switch for the backlight and the white. The ditch lights are switched together, just a question of do I want the amber backlight or the white light.You’re running a dual switch for each ditch light? Niche but hey whatever works. I use that same dual switch for my amber and white function light bar
What lights did you get with the ditch light brackets?It looks like these just dropped on their site. I just ordered the ditch light brackets. The half ladder looks cool, especially for the price.

2024 - 25 Toyota Land Cruiser/Prado 250 Rear Half Ladder | NashFabCo
All new Aluminum construction! The Aluminum Construction Makes it a rust free Product!!If adding RotoPax Bracket it possible might trip rear collision sensor and apply the breaks! Now available in 14 Colors! Color Samples in photos Above, No Charge for Standard Black. Driver side available for...www.nashfabco.com

2024 - 25 Toyota Land Cruiser/Prado 250 Ditch Light Plates | NashFabCo
2 Week lead time before ship out! Sold as a Pair! (2) Replaces the oem plastic hood pieces with an attachment point for Accessories! The Aluminum Construction Makes it a rust free Product!! -Made from 14ga Aluminum to prevent Rust and keep it light weight!-cnc cut-Perfect fit that flows with...www.nashfabco.com
I bought the bracket so now I'm looking for some lights
- Thread starter
- #33
I purchased Baja Design Pods. I haven't' installed them because I need to have my Auxbeam switch panel installed first.
I got the side shooter pods from ExtremeLED. they are having some decent sales right now.What lights did you get with the ditch light brackets?
I bought the bracket so now I'm looking for some lights
Attachments
we did get the broken side replaced within week but when finally installing the other side's tab broke. the replacement did arrive with instruction. i am just not impressed with the material. it super thin and the tab that supposed to hook it on the top just easily broke so the weld is crap and thin. like i said they did send replacement within week but their first response was kind of crap. saying when installed properly it fits perfect. look it s not rocket science i get it but i installed plenty of parts on our 4runner and without instructions but the pieces are just not a great fit so they didn't have to make it sound like i am completely incompetent. for $200 i would just expected better weld if not better metal that's all. i am not gonna even bother contacting them for replacement honestly, i am just going to recommend them or purchase anything from themMine installed just fine. I did talk to the guy because instructions were lacking. He is super nice.
I'd agree that I'm not terribly happy with the fit of them. I'm wishing I'd have gone with the Rago for $90. May still end up going that route in the future.we did get the broken side replaced within week but when finally installing the other side's tab broke. the replacement did arrive with instruction. i am just not impressed with the material. it super thin and the tab that supposed to hook it on the top just easily broke so the weld is crap and thin. like i said they did send replacement within week but their first response was kind of crap. saying when installed properly it fits perfect. look it s not rocket science i get it but i installed plenty of parts on our 4runner and without instructions but the pieces are just not a great fit so they didn't have to make it sound like i am completely incompetent. for $200 i would just expected better weld if not better metal that's all. i am not gonna even bother contacting them for replacement honestly, i am just going to recommend them or purchase anything from them
*not recommend thewe did get the broken side replaced within week but when finally installing the other side's tab broke. the replacement did arrive with instruction. i am just not impressed with the material. it super thin and the tab that supposed to hook it on the top just easily broke so the weld is crap and thin. like i said they did send replacement within week but their first response was kind of crap. saying when installed properly it fits perfect. look it s not rocket science i get it but i installed plenty of parts on our 4runner and without instructions but the pieces are just not a great fit so they didn't have to make it sound like i am completely incompetent. for $200 i would just expected better weld if not better metal that's all. i am not gonna even bother contacting them for replacement honestly, i am just going to recommend them or purchase anything from them
The ladder looks like a good way to get hurt if its cold and wet or worse. What an abortion. The rest looks good.It looks like these just dropped on their site. I just ordered the ditch light brackets. The half ladder looks cool, especially for the price.

2024 - 25 Toyota Land Cruiser/Prado 250 Rear Half Ladder | NashFabCo
All new Aluminum construction! The Aluminum Construction Makes it a rust free Product!!If adding RotoPax Bracket it possible might trip rear collision sensor and apply the breaks! Now available in 14 Colors! Color Samples in photos Above, No Charge for Standard Black. Driver side available for...www.nashfabco.com

2024 - 25 Toyota Land Cruiser/Prado 250 Ditch Light Plates | NashFabCo
2 Week lead time before ship out! Sold as a Pair! (2) Replaces the oem plastic hood pieces with an attachment point for Accessories! The Aluminum Construction Makes it a rust free Product!! -Made from 14ga Aluminum to prevent Rust and keep it light weight!-cnc cut-Perfect fit that flows with...www.nashfabco.com
I had a kill switch installed last week and had the guy take a stab at the relay box install. I dont think he was the brightest bulb. Dont like the location he chose so I will probably move it some point soon.Let us know how it goes with the Relay Box.
I placed an order for square cube switches from Cali. I also ordered 2024 2025 Toyota Landcruiser 250 Auxiliary Upfitter Switch Panel Stock Look off of eBay.
Attachments
I don’t have anything like your electrical skill set in my brain. But wish I did.I hope that's not too confusing as I don't know what your skill set is.
Similar threads
- Replies
- 5
- Views
- 706
- Replies
- 8
- Views
- 1K
- Replies
- 2
- Views
- 647
