Note as of 10/6/24: I have just about completed my build out and am quite satisfied with the rig as it now is (other than the many minor design oddities noted throughout this forum).
Hello,
I find it very helpful when others share their build outs and modifications, so I thought I would do the same.
Background: The usage of my vehicle will be only 5% off road, with the rest a mix of highway and in-town driving. However, I do like a rugged look to my vehicles so I invest accordingly. I only tow a utility trailer occasionally. I need to be able to throw a sheet of plywood, lumber and ladders on top for the endless home projects.
This was my starting point:
Here are the current plans to customize my rig (not necessarily in order):
EXTERIOR:
1. Full front PPF (including front quarter panels and A pillar) with ceramic coating on remainder of vehicle. Remove IMAX badge from rear door. (DONE)
2. Replace 20" inch wheels with 18" black stock rims from an FE and mount 265/70/18 Falken Wildpeak A/T4s. (DONE)
3. Replace wheel center caps with bronze "TOYOTA" caps (DONE)
4. Replace stock roof rack with full length rack from Greenlane Offroad (DONE)
5. Replace stock running boards with step/sliders from Greenlane Offroad (DONE)
6. Upgrade to premium horn (DONE)
7. Paint or wrap the silver front and back valences in black to match rest of bumper (Back DONE)
INTERIOR:
7. 3D-printed tray for cooling box (DONE)
8. Find a more comfortable elbow rest for driver's door. The stock padding is insufficient on long drives.
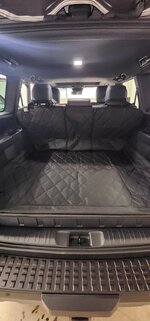
9. Back seat cover to protect upholstery from pets and kids (DONE)
10. Add lighted door sills (DONE)
11. See if I can find a way to "hinge" the rear storage compartment lid. It is a PIA right now as it always comes off when you open it.
I am just starting on this journey and will provide updates as things progress.
Comments and suggestions welcome.
Cheers
This is where I started:

This is where I am now:


Hello,
I find it very helpful when others share their build outs and modifications, so I thought I would do the same.
Background: The usage of my vehicle will be only 5% off road, with the rest a mix of highway and in-town driving. However, I do like a rugged look to my vehicles so I invest accordingly. I only tow a utility trailer occasionally. I need to be able to throw a sheet of plywood, lumber and ladders on top for the endless home projects.
This was my starting point:
LC Premium Package with 20" wheels, cargo mat, door edge guards. Meteor Shower with black interior
Here are the current plans to customize my rig (not necessarily in order):
EXTERIOR:
1. Full front PPF (including front quarter panels and A pillar) with ceramic coating on remainder of vehicle. Remove IMAX badge from rear door. (DONE)
2. Replace 20" inch wheels with 18" black stock rims from an FE and mount 265/70/18 Falken Wildpeak A/T4s. (DONE)
3. Replace wheel center caps with bronze "TOYOTA" caps (DONE)
4. Replace stock roof rack with full length rack from Greenlane Offroad (DONE)
5. Replace stock running boards with step/sliders from Greenlane Offroad (DONE)
6. Upgrade to premium horn (DONE)
7. Paint or wrap the silver front and back valences in black to match rest of bumper (Back DONE)
INTERIOR:
7. 3D-printed tray for cooling box (DONE)
8. Find a more comfortable elbow rest for driver's door. The stock padding is insufficient on long drives.
9. Back seat cover to protect upholstery from pets and kids (DONE)
10. Add lighted door sills (DONE)
11. See if I can find a way to "hinge" the rear storage compartment lid. It is a PIA right now as it always comes off when you open it.
I am just starting on this journey and will provide updates as things progress.
Comments and suggestions welcome.
Cheers
This is where I started:
This is where I am now:
Last edited: