Drawer system and fridge slider

t3lcfe

Active member
📛 Founding Member
Aug 18, 2024
82
Media
88
118
Anaheim, CA
Vehicles
2024 Land Cruiser FE
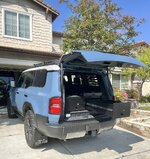
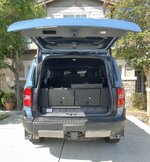
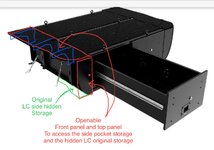
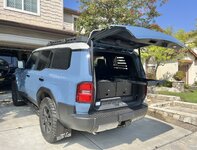
For over-landing/ off-grid camping/ off-roading , I just installed the drawer system and fridge slider for my LCFE. I also did some custom side wings / fillers to it. It helps to organize stuffs in order, secure and maximize the trunk space.
( I had same system for my Gwagon for 8 years and love it)
 

Attachments

  • IMG_7267.jpeg
    IMG_7267.jpeg
    483.4 KB · Views: 308
  • IMG_7266.jpeg
    IMG_7266.jpeg
    623.4 KB · Views: 306
  • IMG_7264.jpeg
    IMG_7264.jpeg
    520.3 KB · Views: 287
Kind of custom.
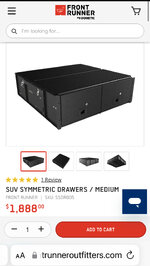
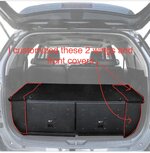
I bought the main/central 2-drawer system from Frontrunneroutfitters.com https://www.frontrunneroutfitters.com/en/us/front-runner-universal-drawer-system.html. This is “universal” drawer system which fits most suv. They usually design the “complete” system to fit the specific vehicle. (I had that kind of set for my Gwagon). Unfortunately, they won’t make it for LC 250! So I have to custom myself 2 wings / fillers to perfect fit 2 sides and level with the top of rear “cup holders”. Someone just leaves 2 sides opened, but I want the “perfect manufacture-like”, so I did it
After all the fridge slider is just bolted/mounted on top
 

Attachments

  • IMG_7287.jpeg
    IMG_7287.jpeg
    540.4 KB · Views: 212
man that look better than the kitchen cabinets that my wife keep telling me to remodel.
 
Photos here illustrate what I did “custom” stuffs beside the main drawer system.
I always go over landing /offgrid camping with wife and 2 teen boys so carry a lot of stuffs. This drawer system+fridge slider help us to organize stuffs. RTT and RTT extension are where we sleep in so no sleep flat form needed in trunk ;)
 

Attachments

  • IMG_7288.jpeg
    IMG_7288.jpeg
    270.4 KB · Views: 178
  • IMG_7289.jpeg
    IMG_7289.jpeg
    146.1 KB · Views: 196
Very nice job. Question now are you powering the Frig . I have a slider in my FJ and want to install in my LC. Right now I'm using an Echoflow power . It's good for 3 days then I need to charge back up.
 
That looks awesome! I want to do exactly the samething, but remove the 2nd row seats and extend a bed platform.

Can I ask, how much room (height wise) do you have between the deck that you built and the roof? Wondering if there is enough room to sleep comfortably on top of it.
 
Currently, for my other vehicle Gwagon beside 2000W Jackery, I have second battery setup in the trunk next to fridge (passenger side). It also use for other accessories lights. With this I can have more than a week long of offgrid.
For LC:
1/ I may have same setup / power for LC.
2/ However, take advance of super quick charging 2400W power outlet and automatic engine turning on when main battery in low juice, I may just have only Jackery connected to 2400W then connect the fridge to Jackery. Option 2 seems very promising.
 
That looks awesome! I want to do exactly the samething, but remove the 2nd row seats and extend a bed platform.

Can I ask, how much room (height wise) do you have between the deck that you built and the roof? Wondering if there is enough room to sleep comfortably on top of it.
For your purpose (comfortable sleeping flat form), you should consider the lower drawer system. The LC battery pack takes up almost 4” height space already.
I chose this drawer system because I want to maximum the storage and just enough room (height) for my fridge.
We sleep in the roof top tent.
This aluminum drawer type is weather proof and durable compare to plywood type.
 
When you installed these drawers, did you first lay down any sort of sheet to "level" the back?

I ask this because I already have some drawers I've thought of using, but the plastic trim piece that borders the edge of the battery portion of the rear storage makes the surface slightly uneven.
 
I didn’t. The surface is generally flat. The plastic trim at around the battery is just for cosmetic so I just lay the drawer system on top of it and carpet.
Nothing to bolt/ screw the drawer system down, but anchor down to 4 hooks of the trunk (see the previous illustration photos)
Hope it is clear and helpful for you.
 
Currently, for my other vehicle Gwagon beside 2000W Jackery, I have second battery setup in the trunk next to fridge (passenger side). It also use for other accessories lights. With this I can have more than a week long of offgrid.
For LC:
1/ I may have same setup / power for LC.
2/ However, take advance of super quick charging 2400W power outlet and automatic engine turning on when main battery in low juice, I may just have only Jackery connected to 2400W then connect the fridge to Jackery. Option 2 seems very promising.
I just got back from a 4100+ mile trip in the new 250 and before that I've made multiple trips over the years with my fridge plugged into my Jackery and the Jackery plugged into a 12V supply I'd rigged up in the cargo area of my 200 series. This was always a good, viable solution for me that avoided a dual battery setup and the expense/complexity involved with that. Additionally, I can use the Jackery for other things when not camping like running the fridge in my house for a couple of days if the power goes out. I love having a tool or device that solves multiple problems.

I found that the 100W supplied by the 12V system is enough to keep the battery topped off if I wasn't charging the ebike battery AND traveling a few hours. However, my eBike battery is larger (700WH) than the Jackery and sucks the juice down faster than the 12V system can supply for the Jackery. So, I upgraded to an Anker 800WH and was VERY pleased with it. Specifically, I kept the Anker plugged into the 12V system and also ran an extension cord from the Anker to the inverter. The Anker has the option (via the smartphone app) to "turbo charge" and drink up the power at 1100+ watts from the inverter vs the 100 watts from the 12V system. This was an AWESOME solution for MY needs as the 12v system would trickle juice in whenever the truck was running and when I noticed that the Anker was starting to get low, I could kick on the inverter, turn on Turbo Charge and fill it back up in 30-45 minutes while driving versus the 8-10 hours needed via 12V system.
 
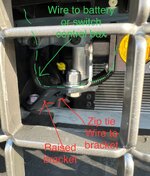
Soon, when I have time I will “document/photo” how to have clean/organize wiring for ACC lights including the Westcott Design brackets/ditch lights, and my own custom simple brackets.
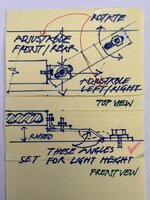
I didn’t do any fancy CAD drawings at all.
Here is 1 of example of the very simple brackets for front 20” Baja design light bar which flexible/adjustable enough for left/right and forward/backward
(because the light and manufacturing bolts are behind the grill, so I cannot have super accurate measurement. I figure out with that basic brackets for easy and myself installation/fitment . All installation is from below/behind the grill without front bumper removed. Only front skid plate removed with 6 bolts)
 

Attachments

  • IMG_7389.jpeg
    IMG_7389.jpeg
    305.2 KB · Views: 73
  • IMG_7390.jpeg
    IMG_7390.jpeg
    270.4 KB · Views: 71
  • IMG_7395.jpeg
    IMG_7395.jpeg
    344.7 KB · Views: 86
Last edited:
Back
Top