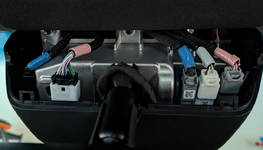
Here's a quick overview using the Dongar 10-pin Type B adapter. This was easy enough and the Garmin X310 is so small (I think most 3rd party cameras are ... ) that I am very happy I didn't get the factory dash cam.
The top of the two-piece shell comes off first. Use your index finger on each hand to pull towards yourself while bracing against the bottom half of the shell with your thumbs.

Then push the bottom piece downwards along the windshield using both hands -- you are sliding it off the hanger attached to the windshield.

Hold the latch on the white cable and remove from the plug.

The Dongar adapter connects to the white cable and plug. I opted to stick the USB adapter part to this flat surface.

The USB cables Dongar included were slightly too short, and the one Garmin provided with the camera is intended to be long enough for routing to a 12V outlet. I didn't care to wait and buy a more appropriate cable, so zip ties it is. Probably should have added one more so the excess spool isn't hanging down.

Don't judge my zip tie cut, I just noticed how bad it is while posting this.
Reattach the bottom of the shell first, by sliding it back up into place. This piece should feel firmly connected when correctly reattached.

The top piece is a bit more finicky, but you just need to line up both slides and slowly push it forward back into position. Try to move both sides equally, rather than one after another.
Finally mount the camera where desired and connect it. Mine fired right up, though I forgot to buy an SD card ... so we'll see how it works tomorrow.
The top of the two-piece shell comes off first. Use your index finger on each hand to pull towards yourself while bracing against the bottom half of the shell with your thumbs.
Then push the bottom piece downwards along the windshield using both hands -- you are sliding it off the hanger attached to the windshield.
Hold the latch on the white cable and remove from the plug.
The Dongar adapter connects to the white cable and plug. I opted to stick the USB adapter part to this flat surface.
The USB cables Dongar included were slightly too short, and the one Garmin provided with the camera is intended to be long enough for routing to a 12V outlet. I didn't care to wait and buy a more appropriate cable, so zip ties it is. Probably should have added one more so the excess spool isn't hanging down.
Don't judge my zip tie cut, I just noticed how bad it is while posting this.
There is plenty of space within the bottom shell for the excess cable and adapter components. Run the desired amount of USB cable out the mirror stem gap.Reattach the bottom of the shell first, by sliding it back up into place. This piece should feel firmly connected when correctly reattached.
The top piece is a bit more finicky, but you just need to line up both slides and slowly push it forward back into position. Try to move both sides equally, rather than one after another.
Finally mount the camera where desired and connect it. Mine fired right up, though I forgot to buy an SD card ... so we'll see how it works tomorrow.


