All done. Here are some tips to make the front valence an easier time for whoever does this next:
Remove the front skid plate (the clunky OEM black one, maybe you don't have to with the FE one)
Remove the 4 bolts along the bottom edge of the bumper trim. they've got a big flat washer and the bolt and washer are black. Now that bottom part of the plastic bumper and flex a bit!
Remove the 4 push pin clips in the trim
Remove the 2 screws. This can be tricky, but with the two things above removed, you have some room to flex the bumper trim to get a screw driver in there. I have a flexible shaft screw driver and it was great for this.
Remove the 2 white clips on each side. This seems really really difficult, but again with the extra wiggle room from the first two steps, get two hands in there, one on either side of the clip. Use your outside hand to depress the tab and the other to pull the clip out. You may need to wiggle. If you can fit a trim tool or flat head that might work to depress the tab as well. I used my fingers ultimately so that I could feel each side as I went.
I managed to keep the clips in great shape and remove them with this method. I do recommend buying a small pack of extra like Honey Badger shared. Just in case!
Go slow and don't sweat it. I was in super chill mode and used a spare pillow we had wrapped in a garbage bag so I could look and feel around a bunch without cramping my neck .
Here is a rough idea of what things you will need to remove or mess with:
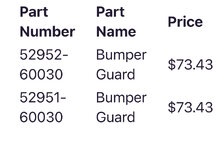
I would love a part number for the black valances as well (front / rear bumper). We dealt with the same thing on the 4runner - Unless you had a TRD Pro. I won't have mine for several weeks but will remove and paint or order new in black. I have never liked silver trim.... unless the vehicle is silver of course
Any update on this? I am 100% in agreement with you on the silver. I have a black LC and need the silver to be black ASAP. Any guidance on best way to do it would be much appreciated.
Any update on this? I am 100% in agreement with you on the silver. I have a black LC and need the silver to be black ASAP. Any guidance on best way to do it would be much appreciated.
Not as bad with the half hitch cover.. but I agree it could use some work. I have an Agency6 shackle and locking bolt that I’ll either leave hanging from the receiver or keep in the recovery kit.
 .
.")