Hey there,
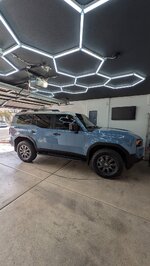
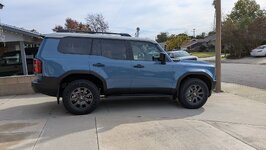
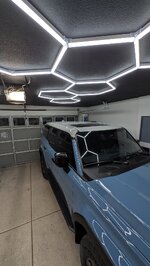
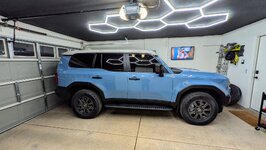
Putting this all in one place to hopefully help someone else out. Today I did a roof rack delete for my 2025 Land Cruiser Land Cruiser trim with no intention of installing another roof rack. (I really like the clean roof look from the 1958s).
In order to complete the roof rack delete, you need have a roof rack delete kit but at the time of writing this, I do not believe an all in one kit exists yet for the LC. The 4Runner roof rack delete kits have compatible parts but you will be short some pieces. The LC connects at 3 points whereas the 4Runner OEM racks connect at 2 points. Instead, I ordered all the parts individually from ToyotaPartsDeal.com as it was about $80 less than my local dealer. See parts and steps below with hyperlinks to products. Disclaimer: You may not need the RTV considering the bracket has a foam seal and the bolts have a rubber gasket. However, I'm somewhat paranoid from previous issues with water leaks on my previous 4Runner with an aftermarket roof rack.
Items/Parts Used
1) Towel to lay tools down on roof
2) Gentle Surface Cleaner
3) Plastic panel pry tool
4) 12MM Socket Wrench
5) 10MM Socket Wrench
6) Microfiber Cloths
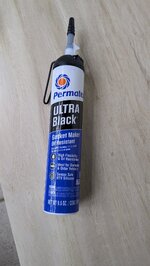
7) Permatex Ultra Black RTV
8) 6 x Toyota 75596-60040 COVER, ROOF DRIP SID
9) 12 x Toyota 90119-08D28 Bolt, w/Washer
10) 6 x Toyota 63185-42020 Bracket, Roof Rack (ToyotaPartsDeal.com only sells in quantity of 10)
Summary of my steps:
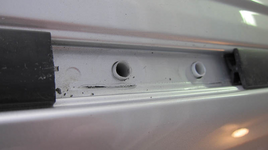
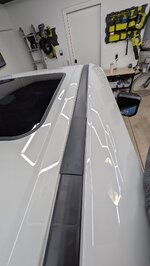
1) Pry up the plastic covers (this video shows where to pry from)
2) Unscrew the 10 x 12mm bolts underneath the plastic covers (carefully, from what I've read, the white female sockets can drop into the vehicle which requires removing the headliner)
3) Remove rack
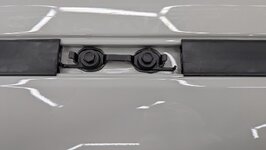
4) Unscrew 4 x 10mm brackets from the middle mounting bracket (again, carefully)
5) Clean area with cleaner and microfibers
6) Apply RTV around the outside of the female mounting sockets (I used this videos recommendation for RTV brand and application method)
7) Place bracket (Toyota 63185-42020 Bracket, Roof Rack )with arrow pointing away from vehicle
8) Apply a little RTV in the hole and then bolt bracket down (Toyota 90119-08D28 Bolt, w/Washer)
9) Snap the covers onto the bracket with the arrows facing away from vehicle (Toyota 75596-60040 COVER, ROOF DRIP SID)
10) Done!
Hope this helps! Happy adventures!
Putting this all in one place to hopefully help someone else out. Today I did a roof rack delete for my 2025 Land Cruiser Land Cruiser trim with no intention of installing another roof rack. (I really like the clean roof look from the 1958s).
In order to complete the roof rack delete, you need have a roof rack delete kit but at the time of writing this, I do not believe an all in one kit exists yet for the LC. The 4Runner roof rack delete kits have compatible parts but you will be short some pieces. The LC connects at 3 points whereas the 4Runner OEM racks connect at 2 points. Instead, I ordered all the parts individually from ToyotaPartsDeal.com as it was about $80 less than my local dealer. See parts and steps below with hyperlinks to products. Disclaimer: You may not need the RTV considering the bracket has a foam seal and the bolts have a rubber gasket. However, I'm somewhat paranoid from previous issues with water leaks on my previous 4Runner with an aftermarket roof rack.
Items/Parts Used
1) Towel to lay tools down on roof
2) Gentle Surface Cleaner
3) Plastic panel pry tool
4) 12MM Socket Wrench
5) 10MM Socket Wrench
6) Microfiber Cloths
7) Permatex Ultra Black RTV
8) 6 x Toyota 75596-60040 COVER, ROOF DRIP SID
9) 12 x Toyota 90119-08D28 Bolt, w/Washer
10) 6 x Toyota 63185-42020 Bracket, Roof Rack (ToyotaPartsDeal.com only sells in quantity of 10)
Summary of my steps:
1) Pry up the plastic covers (this video shows where to pry from)
2) Unscrew the 10 x 12mm bolts underneath the plastic covers (carefully, from what I've read, the white female sockets can drop into the vehicle which requires removing the headliner)
3) Remove rack
4) Unscrew 4 x 10mm brackets from the middle mounting bracket (again, carefully)
5) Clean area with cleaner and microfibers
6) Apply RTV around the outside of the female mounting sockets (I used this videos recommendation for RTV brand and application method)
7) Place bracket (Toyota 63185-42020 Bracket, Roof Rack )with arrow pointing away from vehicle
8) Apply a little RTV in the hole and then bolt bracket down (Toyota 90119-08D28 Bolt, w/Washer)
9) Snap the covers onto the bracket with the arrows facing away from vehicle (Toyota 75596-60040 COVER, ROOF DRIP SID)
10) Done!
Hope this helps! Happy adventures!
Attachments
-
 PXL_20250223_030022660.jpg262 KB · Views: 138
 -
 1740287323628.png350 KB · Views: 113
 -
 PXL_20250223_030032626.MP.jpg160.2 KB · Views: 112
 -
 PXL_20250223_032317955.MP.jpg250.8 KB · Views: 112
 -
 PXL_20250223_044426161.MP.jpg106.2 KB · Views: 136
 -
 PXL_20250223_030016544.MP-EDIT (1).jpg276.3 KB · Views: 132
 -
 PXL_20250223_030040686.jpg136.4 KB · Views: 134
Last edited: