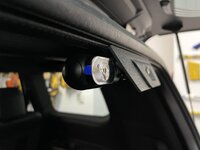
Just broke a piece during rear dash cam install, please help identifying a part

little_banana

Member
📛 Founding Member
Mar 26, 2024
58
Media
7
44
Texas
Vehicles
BMW M340i
Spent an entire afternoon installing my Viofo A229 Pro. The rear dash cam was a pain in the rear.
I routed rear cable through one of these rubber grommet on the rear hatch, the one on the right to be exact. While pulling out the while plastic clip, i accidentally broke a tab, see the second image.
Now the rubber seal won't sit flush against the door frame, so water could potential get in. But seems like the white plastic thing can be taken apart in the middle, replaced by a new one, without taking down the entire wiring boot assembly.
Anybody know exactly what these while clips are called so i can try to order one from Toyota?
If you need any suggestions on where to route the cables or what i used to install the front cam without a cigarette letter plug, let me know and i'll give you couple tips. The install looks pretty clean overall.
IMG_8958.jpeg

IMG_8959.jpeg
IMG_8960.jpeg
 
Ha just did the same install today but thankfully didn't break anything. I went through the same rubber channel in the back, but I didn't pull out the white plastic part, I just removed the rubber from around it and left the plastic tabbed part in place seated in the metal. Had no idea it separated to go around the wiring harness but makes sense.

Sucks that that happened! Are the remaining tabs not enough to hold it in place to sit flush? Seems like a hard part to track down to replace... I'd be tempted to try to secure it from beneath: pull the headliner down and put a small binder clip or something on it from beneath while pushing it down from the top.
 
It looks like the actual tab isn't broken off. If that's the case, you might try.....
pulling the plastic part out again (like in the picture) and insert a toothpick to ensure the sprig/tab stays away from the pass-thru body and put just a dab of RTV behind the plastic spring/tab, let that dry. That would hold the spring/tab in the out position but still allow some movement. When reinstalling it, make sure you put that one in first. (worth a shot)
 
Ha just did the same install today but thankfully didn't break anything. I went through the same rubber channel in the back, but I didn't pull out the white plastic part, I just removed the rubber from around it and left the plastic tabbed part in place seated in the metal. Had no idea it separated to go around the wiring harness but makes sense.

Sucks that that happened! Are the remaining tabs not enough to hold it in place to sit flush? Seems like a hard part to track down to replace... I'd be tempted to try to secure it from beneath: pull the headliner down and put a small binder clip or something on it from beneath while pushing it down from the top.
I went with the left wiring grommet first but it was so har to fish the wire through to the rear glass, should've been more careful not to forcibly pull the white plastic part but use the two tabs they had on there.
Yeah, the remaining tab on the right side is just not strong enough to hold it in place. Been searching all over the internet but couldn't find exactly what it was called.
The thing about these headliners is they are so rigid, not in a good way. If you attempt to bend or stretch them, you could easily tear it apart or damage it. I really hate them during the install and routing the dash cam wire to the front. The space i have is just not enough for me to put a hand though and work with a small binder clip or sort.
 
It looks like the actual tab isn't broken off. If that's the case, you might try.....
pulling the plastic part out again (like in the picture) and insert a toothpick to ensure the sprig/tab stays away from the pass-thru body and put just a dab of RTV behind the plastic spring/tab, let that dry. That would hold the spring/tab in the out position but still allow some movement. When reinstalling it, make sure you put that one in first. (worth a shot)
The broken plastic tab is still on there, so that's actually a pretty solid suggestion, i might try that if i can't get a part number for it.
Why RTV? I've never used it in my entire life.
 
I went with the left wiring grommet first but it was so har to fish the wire through to the rear glass, should've been more careful not to forcibly pull the white plastic part but use the two tabs they had on there.
Yeah, the remaining tab on the right side is just not strong enough to hold it in place. Been searching all over the internet but couldn't find exactly what it was called.
The thing about these headliners is they are so rigid, not in a good way. If you attempt to bend or stretch them, you could easily tear it apart or damage it. I really hate them during the install and routing the dash cam wire to the front. The space i have is just not enough for me to put a hand though and work with a small binder clip or sort.

I checked out the left wiring channel but it looked like it was terminated by plugs on each end, whereas the right one just had loose wires running through, so I didn't look back after that. For anyone else, the rubber channeling comes off of the white plastic bit so you can just leave that in place, disconnect the rubber tube from both ends, and fish things through (still with difficulty, I used a thin bamboo skewer and taped the cable end to that and pulled it out):

IMG_3732.jpeg

Regarding the headliner: I disconnected it carefully from the center, right and left tabs nearest the back. This gave me enough clearance to get a hand in (which would let you use the tabs if you know they're there), but you're right that you have to be very careful with the headliner so as not to bend or disform it. Getting the headliner back onto those 3 tabs was probably the 2nd hardest part of my installation because they want to slot in from the side rather than just press-fit, but nothing too crazy to get it done.
 
The broken plastic tab is still on there, so that's actually a pretty solid suggestion, i might try that if i can't get a part number for it.
Why RTV? I've never used it in my entire life.
RTV (Room Temperature Vulcanization) is also called Gasket maker/sealer and is available at any parts store. It will cure to a solid but still have a little flexibility.

Pro Tip: RTV will cause copper/brass to corrode if enough of it comes into direct contact with the copper. Found this out when I repaired the fuel level sending unit on my boat. I had to dig out all the water-proofing epoxy that sealed the connector to repair the wires, put gobs of RTV to seal it back up after it cured, greenish corrosion was clearly visible around the terminals.

It's great for waterproofing lots of things just not copper!
 
I checked out the left wiring channel but it looked like it was terminated by plugs on each end, whereas the right one just had loose wires running through, so I didn't look back after that. For anyone else, the rubber channeling comes off of the white plastic bit so you can just leave that in place, disconnect the rubber tube from both ends, and fish things through (still with difficulty, I used a thin bamboo skewer and taped the cable end to that and pulled it out):

View attachment 5431

Regarding the headliner: I disconnected it carefully from the center, right and left tabs nearest the back. This gave me enough clearance to get a hand in (which would let you use the tabs if you know they're there), but you're right that you have to be very careful with the headliner so as not to bend or disform it. Getting the headliner back onto those 3 tabs was probably the 2nd hardest part of my installation because they want to slot in from the side rather than just press-fit, but nothing too crazy to get it done.
"I checked out the left wiring channel but it looked like it was terminated by plugs on each end". You can actually remove the plugs on each end to fit a cable through. I found out the left side rubber tub was a little shorter than right side and i was able to get my cable through fairly easy without using a coat hanger. It was that black plastic on the far left of your picture stop my cable fishing through., so ended up going to the ride side.
So in the long run, the right side with a coat hanger or some sort is the way to go.
I just went out and checked, couldn't find the tabs you mentioned for the headliner. Really afraid to damage it by pulling too much.
By the way, where did you end up mounting the camera? This is what mine looks like. With the rear privacy glass, I'm afraid it is not looking as clear as the camera above it.
IMG_8963.jpeg
 
RTV (Room Temperature Vulcanization) is also called Gasket maker/sealer and is available at any parts store. It will cure to a solid but still have a little flexibility.

Pro Tip: RTV will cause copper/brass to corrode if enough of it comes into direct contact with the copper. Found this out when I repaired the fuel level sending unit on my boat. I had to dig out all the water-proofing epoxy that sealed the connector to repair the wires, put gobs of RTV to seal it back up after it cured, greenish corrosion was clearly visible around the terminals.

It's great for waterproofing lots of things just not copper!
So it is like super glue but with flexibility, i'm gonna swing by Harbor Freight later today and pick up one tube. Something like this would work right? https://www.harborfreight.com/3-oz-clear-rtv-silicone-96041.html

Thanks for the tip! I just need a tiny drop to hold that plastic tip in place.
 
"I checked out the left wiring channel but it looked like it was terminated by plugs on each end". You can actually remove the plugs on each end to fit a cable through. I found out the left side rubber tub was a little shorter than right side and i was able to get my cable through fairly easy without using a coat hanger. It was that black plastic on the far left of your picture stop my cable fishing through., so ended up going to the ride side.
So in the long run, the right side with a coat hanger or some sort is the way to go.
I just went out and checked, couldn't find the tabs you mentioned for the headliner. Really afraid to damage it by pulling too much.
By the way, where did you end up mounting the camera? This is what mine looks like. With the rear privacy glass, I'm afraid it is not looking as clear as the camera above it.View attachment 5437

Good to know about the left channel, but the right still seems like the way to go and I hope I never have to do this again to decide :ROFLMAO:

Regarding the headliner: If you lift up the rubber door seal and expose the edge of the header, you can feel where it flexes and where it doesn't. From where it doesn't flex, you should see white plastic bits (your favorite!) about 3" or so back in that connect the headliner to the roof. I stuck a flat palm in with the plastic bit between my middle fingers and pushed down and it came right out of each spot. If you just remove the rubber channel from the white plastic part that broke for you, I don't think you need to do this step but I was trying to get a better view of what was going on and how to route the cable.

I thought about mounting like you did, but I thought the rear camera already bumped down, and then another camera lower than that would probably get knocked off at some point loading and unloading from the open glass. I designed a mount and 3D printed it to keep it to the side of the existing camera. The Viofo camera is a friction-fit slide into the mount, so I didn't even remove the adhesive cover

IMG_3735.jpeg IMG_3727.jpeg
 
Good to know about the left channel, but the right still seems like the way to go and I hope I never have to do this again to decide :ROFLMAO:

Regarding the headliner: If you lift up the rubber door seal and expose the edge of the header, you can feel where it flexes and where it doesn't. From where it doesn't flex, you should see white plastic bits (your favorite!) about 3" or so back in that connect the headliner to the roof. I stuck a flat palm in with the plastic bit between my middle fingers and pushed down and it came right out of each spot. If you just remove the rubber channel from the white plastic part that broke for you, I don't think you need to do this step but I was trying to get a better view of what was going on and how to route the cable.

I thought about mounting like you did, but I thought the rear camera already bumped down, and then another camera lower than that would probably get knocked off at some point loading and unloading from the open glass. I designed a mount and 3D printed it to keep it to the side of the existing camera. The Viofo camera is a friction-fit slide into the mount, so I didn't even remove the adhesive cover

View attachment 5440 View attachment 5439
If i were to think about doing this all over again, i would probably just install the front one and never mess with the rear camera. These pop up window is nice to have but make the install so much more complicated. :cry:

When i get the RTV silicon, i might try it again and see if i need to remove the headliner. Thanks for the write up!!

I love the 3D print idea, that is pure genius and looks so much cleaner this way!!! With it against the rear glass, the view would be much better too. Now, is it worth to invest a 3D printer? Any recommendations ?:)

Every time I saw a clip of an incident with a rear channel dash cam, I thought it added a lot of context to what happened and seemed like it was worth a try. Hopefully all of my drives are boring and I never need it tho.

A 3D printer is definitely not worth it just for this, but if you know the design software (can be a steep learning curve) it becomes one of the most useful tools in the house (and I have a lot of tools). In another post, I shared the cool box storage tray I made for my LC, and it's constantly in use for other functional things around the house. I got a Bambu Lab X1C and it's an amazing machine: super fast, great quality, mostly automated, and highly recommended.
I can totally relate on the front camera. Currently dealing with a broken windshield due to falling rocks out of a garbage truck, luckily my front camera caught it and I stopped the garbage truck and got their insurance information. With the footage, they can’t even deny it, especially with the audio.
Now my first mod to a new vehicle is dash cam.

I’ve been thinking about a 3D Printer but haven’t had much use for one. I do like to collect tools too, haha. Will definitely check out your other posts and this printer too.

After seeing your bracket, I would gladly pay you to make one for me. Looks so clean and I can’t get over it.
 
With the footage, they can’t even deny it, especially with the audio.
Now my first mod to a new vehicle is dash cam.

After seeing your bracket, I would gladly pay you to make one for me. Looks so clean and I can’t get over it.

That's great.. your dashcam already paid for itself in one vehicle at least!

I had some ppl offering to pay me for the coolbox tray too, which is where I have to point out that these things were designed to be 'good enough' for me, not really consumer-grade. I noticed my LC rear camera housing had a slight gap between the back and front pieces and measured it exactly for that gap... others might not even have the same gap in their LC.

Also, 3D printing in general isn't like what you'd normally buy online: it has visible layer lines and sometimes printing artifacts. I think charging people and having them be disappointed would be a downer, so I just publish the designs for anyone to print if they want to and know what they're getting into.
That make sense.
I've been reading up on 3D printer all afternoon, seems like Bambu Lab P1S was a good entry level printer that was recommend by a lot of people as well. I don't have a whole lot use case for one, so probably gonna do more research on it.

Couldn't find your post about "cool box storage tray", do you mind post a link?
 
Yep that'll work or any automotive parts store.
Finally got it to work!!!
I found a zip tie and cut about 1/2'' off the tip, then bent one end to make a V shape to inserted into the broken clip.
IMG_8965.jpeg

IMG_8966.jpeg

Before inserting, i used a toothpick to put a small dab of RTV, so it will hold the zip tie in place. To let the RTV cure, i used the toothpick to push it down and blow dry with a hair dryer for about 5 min.

Did this for both of the front clicks and let them cure for about 2 hours.
Finally when i went back to push the clips into the frame, i heard 2 audible clicks. Now the rubber grommet is sitting flush without a gap, and seems to be a pretty tight fit.
Never going to touch this ever.

Thank you for the suggestion!!!
 
Back
Top