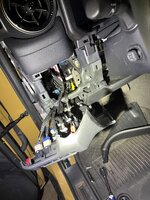
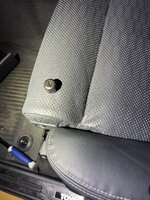
Interior Trim Removal

@EOD Guy, you haven't happened to do the back of the center console yet?

View attachment 9045
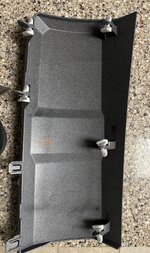
I haven't needed to........... Page 6, is the start of the removal. It looks like the main trim panel is held on by the arrow fasteners and just grasp it on each side about level with the upper/bottom row of buttons and yank it straight backwards. The lower trim (shoe) looks like it has a screw/bolt holding it in place.
 

Attachments

  • FRONT CONSOLE BOX (w-o Cool Box)_ REMOVAL.pdf
    1.8 MB · Views: 116
I haven't needed to........... Page 6, is the start of the removal. It looks like the main trim panel is held on by the arrow fasteners and just grasp it on each side about level with the upper/bottom row of buttons and yank it straight backwards. The lower trim (shoe) looks like it has a screw/bolt holding it in place.
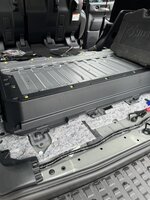
I almost just tried to pop the "shoe" off and I'm REALLY glad I waited. I would have been very upset if I'd cracked that piece because I was impatient. The screw would have screwed me. ;)

Thanks again!
 
I almost just tried to pop the "shoe" off and I'm REALLY glad I waited. I would have been very upset if I'd cracked that piece because I was impatient. The screw would have screwed me. ;)

Thanks again!
I know right....... I've destroyed so many things over the years due to "If I pull just a little harder" . With the Toyotas and access to TIS, I subscribe for a month and down load the wiring diagrams and as many Maint related items as I think I'll need. In the LCs case the wiring diagrams are not near as concise as the Tacomas but the trim panels diagrams are much better, however they are very confusing....... I guess if you had the TIS year around it wouldn't be so bad as everything is hyper-linked, but down loading PDFs and click on a link, sometimes it'll add the step to the one you have open and other times it takes you to a whole different area. Maybe this winter I'll combine some of the PDFs and remove the unusable content.
 
These guys offer an amp for the factory JBL sound system and in this video, show clearly how to remove much of the front dash and center console trim in the process, enjoy!

Beat-Sonic Amp Install (no affiliation!)
This could be useful in the future for sure. I'll be installing a WeBoost cell phone booster at some point and will need to take apart the front part of the console for sure. Also, on my 200 series, the Satellite antennae was TERRIBLE, especially if you had anything on the roof like a rack. So, I hacked the OEM system and put a low key Sirius antenna just above my windshield and never have a problem with reception again. However, guessing which plug was the right one for the antenna and what style of plug it was took a LOT of research to find.
 
These guys offer an amp for the factory JBL sound system and in this video, show clearly how to remove much of the front dash and center console trim in the process, enjoy!

Beat-Sonic Amp Install (no affiliation!)
Man do I wish I had that a few days ago! I took out those things after about 2 hours of praying I didn't break anything.
 
Not really interior trim but the rear bumper colored panels.

These are a royal pain to remove! There are three plastic keepers located along the bottom edge of the cover, easy to see. There is a tab on each white keeper (see picture below) that must be depressed while sliding out the white keeper. The three on the bottom are fairly easy, the two on the upper/outer edge are tricky.

I removed the top bumper cover (the one you would step/sit on) it pulls straight up, no tools required. With a flashlight you can look down into the small slots (that the bumper cover snapped into) and see the white keepers, I used a long skinny screwdriver to depress the tab and at the same time shove it to the side, where it fell into the cover area. Once the cover was off the tabs were easily recovered. I'm not quite sure how I'll get the keepers back on, to be determined after the paint dries....... LOL
 

Attachments

  • Bumper Cover.JPG
    Bumper Cover.JPG
    518.7 KB · Views: 155
Last edited:
Hybrid battery surround/rear cargo floor:

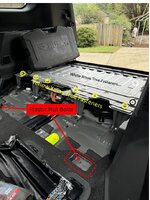
Not hard to remove, you will need a 10mm socket to remove the folding cargo anchors.

Remove the rear hatch scuff plate. It's secured with white Christmas tree fasteners, pulls straight up.
Remove the rear, side covers and trays. Battery side top tray is secured by 2 tabs, lower tray with Christmas tree fasteners, both pull straight up.
Remove rear cover and tray. Secured with white Christmas tree fasteners, pulls straight up.
Remove the front cargo hold downs. With the metal square opened to the fullest, Insert a plastic trim tool at the base of the metal square and pry up the plastic cover (hinges to the rear) and remove the 10mm bolt. The rest of the platform is secured by white Christmas tree fasteners, pulls straight up.
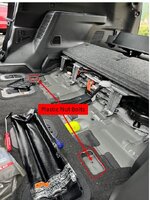
Open the passenger side, front trim cover (2nd row seats folded forward) then remove the plastic nut securing the trim to the floor. Repeat for the driver's side. The front, lower area is secured by white Christmas tree fasteners, pulls straight up. The rear lip is secured by yellow Christmas tree fasteners, pulls straight forward (fasteners stay secured to the frame).
 

Attachments

  • Hybrid 2.JPG
    Hybrid 2.JPG
    371.3 KB · Views: 109
  • Hybrid 4.jpg
    Hybrid 4.jpg
    131.9 KB · Views: 108
  • Hybrid 5.jpg
    Hybrid 5.jpg
    123.2 KB · Views: 125
Last edited:
Hybrid battery surround/rear cargo floor:

Not hard to remove, you will need a 10mm socket to remove the folding cargo anchors.

Remove the rear hatch scuff plate. It's secured with white Christmas tree fasteners, pulls straight up.
Remove the rear, side covers and trays. Battery side top tray is secured by 2 tabs, lower tray with Christmas tree fasteners, both pull straight up.
Remove rear cover and tray. Secured with white Christmas tree fasteners, pulls straight up.
Remove the front cargo hold downs. With the metal square opened to the fullest, Insert a plastic trim tool at the base of the metal square and pry up the plastic cover (hinges to the rear) and remove the 10mm bolt. The rest of the platform is secured by white Christmas tree fasteners, pulls straight up.
Remove the passenger side, front trim cover (2nd row seats folded forward) then remove the plastic nut securing the trim to the floor. Repeat for the driver's side. The front, lower area is secured by white Christmas tree fasteners, pulls straight up. The rear lip is secured by yellow Christmas tree fasteners, pulls straight forward (fasteners stay secured to the frame).
So helpful thank you!
 
Hybrid battery surround/rear cargo floor:

Not hard to remove, you will need a 10mm socket to remove the folding cargo anchors.

Remove the rear hatch scuff plate. It's secured with white Christmas tree fasteners, pulls straight up.
Remove the rear, side covers and trays. Battery side top tray is secured by 2 tabs, lower tray with Christmas tree fasteners, both pull straight up.
Remove rear cover and tray. Secured with white Christmas tree fasteners, pulls straight up.
Remove the front cargo hold downs. With the metal square opened to the fullest, Insert a plastic trim tool at the base of the metal square and pry up the plastic cover (hinges to the rear) and remove the 10mm bolt. The rest of the platform is secured by white Christmas tree fasteners, pulls straight up.
Open the passenger side, front trim cover (2nd row seats folded forward) then remove the plastic nut securing the trim to the floor. Repeat for the driver's side. The front, lower area is secured by white Christmas tree fasteners, pulls straight up. The rear lip is secured by yellow Christmas tree fasteners, pulls straight forward (fasteners stay secured to the frame).
Yeah, it's really very easy to get that trim out of the way if you need to. Seems intimidating but it's about a 5 minute process once you've done it a couple of times.
 
Yeah, it's really very easy to get that trim out of the way if you need to. Seems intimidating but it's about a 5 minute process once you've done it a couple of times.
Yepper, my driver's side front storage tray is no more. For what ever reason it's 1"-2" shallower than the passenger's side. I cut the bottom out and am in the process of replacing it with a 3/16" thick secure storage box.
 
Yepper, my driver's side front storage tray is no more. For what ever reason it's 1"-2" shallower than the passenger's side. I cut the bottom out and am in the process of replacing it with a 3/16" thick secure storage box.
Can't wait to hear about and see that !!
 
Dvr's side trim panel removal.

Remove the rear hatch threshold
Remove the 5 storage trays (rear, R/H, L/H, L/H lower and front)
Remove the cargo floor flip up tie down points
Remove the cargo floor
Remove the rear hybrid battery trim surround (large "U" shape)
Remove the "T" anchor from the Dvr's side rear hatch pillar (gentle twist)
Remove the 10mm bolt beneath the "T" anchor
Remove the 3rd row seat belt trim panel cover (3x3 square)
Remove the 10mm bolt beneath the 3rd row seat belt trim panel cover
Remove the 2nd row dvr's side seat belt anchor bolt.

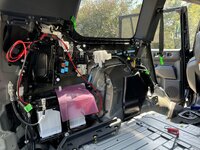
Starting at the rear vertical edge, use an "L" shaped trim panel tool and start popping the fasteners. You will need to disconnect the rear LED light connector and the fwd USB connector.

You do NOT need to remove the upper trim panels (rear hatch to window and the window to door).
 

Attachments

  • Cargo LH trim.jpeg
    Cargo LH trim.jpeg
    403.9 KB · Views: 96
To remove the overhead console:

I used an "L" shaped trim tool remover.
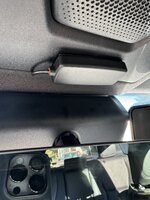
Start at the windshield R/H forward edge of the console and pry straight down. ( I use a piece of a plastic milk jug to protect the headliner while prying) once you can get your fingers in the gap, give it a sharp downwards yank, it'll pop right off.

To get the sun visor hold clip off:
Twist it and it and the inner part (the hook part) will slide right out. The hook part also acts as the keeper for the surround. To get the surround out, use a pick tool or very small bladed screw driver and depress the two very tiny plastic tabs and it'll slide right out. Now the head liner can be pulled away from the roof enough to tuck wires or cable behind/above it. I ran my WeBoost interior antenna cable to the center of the console opening, cut a very small "V" notch about 1/8" so the cable could exit the headliner. I mounted the antenna on the flat plastic area of the console
 

Attachments

  • Antenna.jpeg
    Antenna.jpeg
    396.1 KB · Views: 91
@EOD Guy or anyone else. Can you tell me where this little plastic cover piece goes? it fell off of something when I was removing the switch panel trim.
 

Attachments

  • IMG_4988.jpg
    IMG_4988.jpg
    624.7 KB · Views: 72
  • IMG_4987.jpg
    IMG_4987.jpg
    869.8 KB · Views: 72
@EOD Guy or anyone else. Can you tell me where this little plastic cover piece goes? it fell off of something when I was removing the switch panel trim.
That plastic nut holds the kick panel to the floor. look at the kick panel at the (towards front bumper) forward edge of the kick panel there's a hole. Look at the floorboard area (where the hole should go) you'll see a threaded stud.
 
That plastic nut holds the kick panel to the floor. look at the kick panel at the (towards front bumper) forward edge of the kick panel there's a hole. Look at the floorboard area (where the hole should go) you'll see a threaded stud.
Where would I be in life without EOD guy... Thanks!
 
Awesome thread, I just need to remove the housing in front of the rearview mirror to hook in my Dongar adapter for my Dashcam. Looks like it is just a pull down motion but any specifics to help avoid breaking any clips would be appreciated!
 
Awesome thread, I just need to remove the housing in front of the rearview mirror to hook in my Dongar adapter for my Dashcam. Looks like it is just a pull down motion but any specifics to help avoid breaking any clips would be appreciated!
I've never had it completely off, but when I removed the overhead console, the mirror surround slip towards the dash an inch or so..
 

Attachments

  • Mirror, DIGITAL INNER MIRROR- REMOVAL.pdf
    1.2 MB · Views: 51
Back
Top