I picked up my 2025 LC LC premium yesterday straight off the truck. I’ve already got a few things ordered, I’ll try and document some of the upgrades here.

Navigation
Install the app
How to install the app on iOS
Follow along with the video below to see how to install our site as a web app on your home screen.
Note: This feature may not be available in some browsers.
More options
You are using an out of date browser. It may not display this or other websites correctly.
You should upgrade or use an alternative browser.
You should upgrade or use an alternative browser.
🛠️ Member Build Brian’s "Goldbug" Build
- Thread starter Markarian421
- Start date
Member Build
As a number 1 superfan of your spreadsheet, all I want to know is... what tires are you going to put on it?!?!?
- Thread starter
- #3
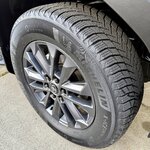
I ordered the Tacoma TRD wheels and will probably put Duratrac RT 265/70R18 SL tires on them. Depending on how long those take to show up, I may put winter tires on the 20" stock wheels, probably Michelin X-Ice Snow tires since that's the main thing available here at the moment. I spend a lot of time making trips to snow this time of year.
- Thread starter
- #4
First not very exciting change: I removed the cross bars. The design that doesn't allow them to be moved makes them of very limited utility. I have an old set of square Thule crossbars I'll use when I need to transport my kayak.
Current plans subject to change at any time:

Current plans subject to change at any time:
- Dongar Pro powered Garmin dash cam for the front.
- Garmin mini 3 in back -- need to figure out a good way to route a cable.
- Transmission skid plate (might arrive today?)
- Michelin X-Ice Snow tires on these 20" wheels for winter driving to places that have winter (winter where I live is just rain).
- Tacoma TRD wheels for the rest of the year. I can spend a whole additional month being indecisive about what tires to put on them!
- Greenlane rock sliders
Last edited:
I like the LC Premium packages. Love the color. Congratulations
- Thread starter
- #6
Front dash cam (Garmin x310) with Dongar Pro install.
First many thanks to @EOD Guy for posting the attached factory dash cam installation directions and his comments about removing the overhead console. And @StickerFab for the video on the same. And of course the @Dongar folks!
First I tried various positions with the camera and the adapter and decided to mount it to the right of the mirror/front cameras. I didn't like the arrangement if it was on the drivers side and I wanted it as high as possible for a better view.
Following the factory install guide, first twist the visor clips counterclockwise about 45 degrees until you can pull them down and out. Next you'll need to release the clips at the top and bottom of the base -- the install guide said to use needle nose pliers, I found it easier to use a pointed trim removal tool to unclip then, then the needle nose pliers to pull them down. Once that's done you can move the headliner down a little.


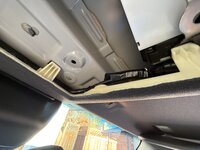
The next and least fun step: remove the overhead console. The really important part is pull down from the front so you don't break the tabs at the back. The video and the instructions make that sound much easier than it is. I tried and failed for quite a while. I finally ended up with this arrangement, old AAA cards to protect the headliner and a couple trim removal tools wedged in place -- I could not get anything to flex enough too get my fingers in there, even the trim removal tools were a challenge. (Please note: pull down, do not pry against the headliner!) Attempts to use one tool at a time failed, the tool would flex and let go. But finally with two I pulled harder and harder until it felt like something was going to break, and then it felt like something broke. Thankfully nothing did. One of the connectors did stay in the ceiling though, I had to use a metal trim removal tool to get it out and put it in the console.


Next up is finding the elusive cable that would power the factory dash cam. Mine was pretty well wrapped up and tucked away, but it's there on the passenger side.


From here things are easy. Again following the factory install guide, pull down the headliner above the windshield just enough to feed the 5 pin Dongar cable through and back to the dash cam power cable. Plug it in, tidy up the extra cable, and tuck it away. Then put the console back up there -- it goes back in way easier than it came down! And put the visor clip bases and clips back up.


I used the needle nose pliers to gently bend the cable at the Dongar Pro end to fit under the headliner better. Then stick the Dongar Pro and the camera mount to the windshield and you're done!


A few final notes: the x310 complains if you don't use the Garmin charger. From what I read, it's looking for 1-2 Amps and is likely to complain on anything less. Also from I read, and from the Dongar folks, should still work fine (and will probably slowly charge) on the ~0.6 Amps provided.


And I went with a different cable to get things a little more out of the way, the straight cable was pushing against the mirror electronics pod. I got two, either will work.

That one is really thick but super soft and flexible. On Amazon: https://www.amazon.com/dp/B0CM3P37PY
There's an even shorter one that just reaches, but it's a pretty light weight. On Amazon: https://www.amazon.com/dp/B0D2CW5ST6
Hopefully someone finds this helpful! If you have questions let me know.
First many thanks to @EOD Guy for posting the attached factory dash cam installation directions and his comments about removing the overhead console. And @StickerFab for the video on the same. And of course the @Dongar folks!
First I tried various positions with the camera and the adapter and decided to mount it to the right of the mirror/front cameras. I didn't like the arrangement if it was on the drivers side and I wanted it as high as possible for a better view.
Following the factory install guide, first twist the visor clips counterclockwise about 45 degrees until you can pull them down and out. Next you'll need to release the clips at the top and bottom of the base -- the install guide said to use needle nose pliers, I found it easier to use a pointed trim removal tool to unclip then, then the needle nose pliers to pull them down. Once that's done you can move the headliner down a little.
The next and least fun step: remove the overhead console. The really important part is pull down from the front so you don't break the tabs at the back. The video and the instructions make that sound much easier than it is. I tried and failed for quite a while. I finally ended up with this arrangement, old AAA cards to protect the headliner and a couple trim removal tools wedged in place -- I could not get anything to flex enough too get my fingers in there, even the trim removal tools were a challenge. (Please note: pull down, do not pry against the headliner!) Attempts to use one tool at a time failed, the tool would flex and let go. But finally with two I pulled harder and harder until it felt like something was going to break, and then it felt like something broke. Thankfully nothing did. One of the connectors did stay in the ceiling though, I had to use a metal trim removal tool to get it out and put it in the console.
Next up is finding the elusive cable that would power the factory dash cam. Mine was pretty well wrapped up and tucked away, but it's there on the passenger side.
From here things are easy. Again following the factory install guide, pull down the headliner above the windshield just enough to feed the 5 pin Dongar cable through and back to the dash cam power cable. Plug it in, tidy up the extra cable, and tuck it away. Then put the console back up there -- it goes back in way easier than it came down! And put the visor clip bases and clips back up.
I used the needle nose pliers to gently bend the cable at the Dongar Pro end to fit under the headliner better. Then stick the Dongar Pro and the camera mount to the windshield and you're done!
A few final notes: the x310 complains if you don't use the Garmin charger. From what I read, it's looking for 1-2 Amps and is likely to complain on anything less. Also from I read, and from the Dongar folks, should still work fine (and will probably slowly charge) on the ~0.6 Amps provided.
And I went with a different cable to get things a little more out of the way, the straight cable was pushing against the mirror electronics pod. I got two, either will work.
That one is really thick but super soft and flexible. On Amazon: https://www.amazon.com/dp/B0CM3P37PY
There's an even shorter one that just reaches, but it's a pretty light weight. On Amazon: https://www.amazon.com/dp/B0D2CW5ST6
Hopefully someone finds this helpful! If you have questions let me know.
Attachments
Last edited:
Was looking to do the same so thanks for the write up which makes it easier to do now.
- Thread starter
- #9
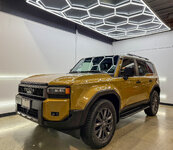
Cool pic with the lighting! Was that at the dealership?Minor updates this weekend: winter tires and ceramic coating.
- Thread starter
- #11
No, I got a local shop (Mar Quality Protection) to do the ceramic coating, this was when I picked it up.Cool pic with the lighting! Was that at the dealership?
Looking good
- Thread starter
- #13
This requires no explanation. I am thinking about getting a new set with a gold more color matched to the Land Cruiser.

Last edited:
- Thread starter
- #14
What I did today: I installed a rear dash cam with temporary power cable, so it's really not worth a writeup (yet). Also a toll tag. And finally a transmission skid plate.
Transmission skid plate install:
First, please excuse the mess -- we were doing garage cleanup and briefly pulled the Land Cruiser in to do this. I was surrounded by random junk and boxes the entire time!
Thanks again to @EOD Guy for the directions from Toyota (attached). They might explain the first big surprise: I got under there and the factory transmission shield and "Stabilizer with Disconnect Mechanism (SDM) protector" were missing! My best guess: the folks at the port followed these same directions when installing my front skid and just removed everything. But then had no upgraded transmission skid plate to install.

If you get one like this, take it back to your dealer and make them give you some kind of skid plate or shields!
In my case this just gave me much less work to do on an already trivially easy project. The only real trick here is you have to loosen the bolts at the back of the front skid plate enough to lower the plate probably half an inch or a little more so you can slide the transmission plate in-between it and the cross member to get these two hooks up in the holes:

There are two just like that. Then it's just the four included bolts. I put Loctite Threadlocker Blue 242 on the bolts, torqued them to the spec., and done.

Transmission skid plate install:
First, please excuse the mess -- we were doing garage cleanup and briefly pulled the Land Cruiser in to do this. I was surrounded by random junk and boxes the entire time!
Thanks again to @EOD Guy for the directions from Toyota (attached). They might explain the first big surprise: I got under there and the factory transmission shield and "Stabilizer with Disconnect Mechanism (SDM) protector" were missing! My best guess: the folks at the port followed these same directions when installing my front skid and just removed everything. But then had no upgraded transmission skid plate to install.
If you get one like this, take it back to your dealer and make them give you some kind of skid plate or shields!
In my case this just gave me much less work to do on an already trivially easy project. The only real trick here is you have to loosen the bolts at the back of the front skid plate enough to lower the plate probably half an inch or a little more so you can slide the transmission plate in-between it and the cross member to get these two hooks up in the holes:
There are two just like that. Then it's just the four included bolts. I put Loctite Threadlocker Blue 242 on the bolts, torqued them to the spec., and done.
Attachments
Thank you for the demonstration. Do you know if there will be any further extensions to the protection. Like covering the transfer case and possibly more?
- Thread starter
- #16
There’s a skid plate for the rear differential on the build page but it doesn’t seem to be available yet.Thank you for the demonstration. Do you know if there will be any further extensions to the protection. Like covering the transfer case and possibly more?
Thank you.
- Thread starter
- #18
Glamour shots from the detailer:


Similar threads
🛠️ Member Build
Upgrade Recomendations
- Replies
- 11
- Views
- 1K


